This guide walks you through preparing your PSD, setting up folders, choosing the right resize method and alignment, and configuring export settings
Thanks for sending this file and I will demonstrate how bulk mockup works and how to use this
in this template.
So to just to give you an overview like I think you have a very good understanding of
how the mockup works you are supposed to change the smart object here and this will reflect
the changes onto the main tab and I believe both these two smart objects are linked somehow.
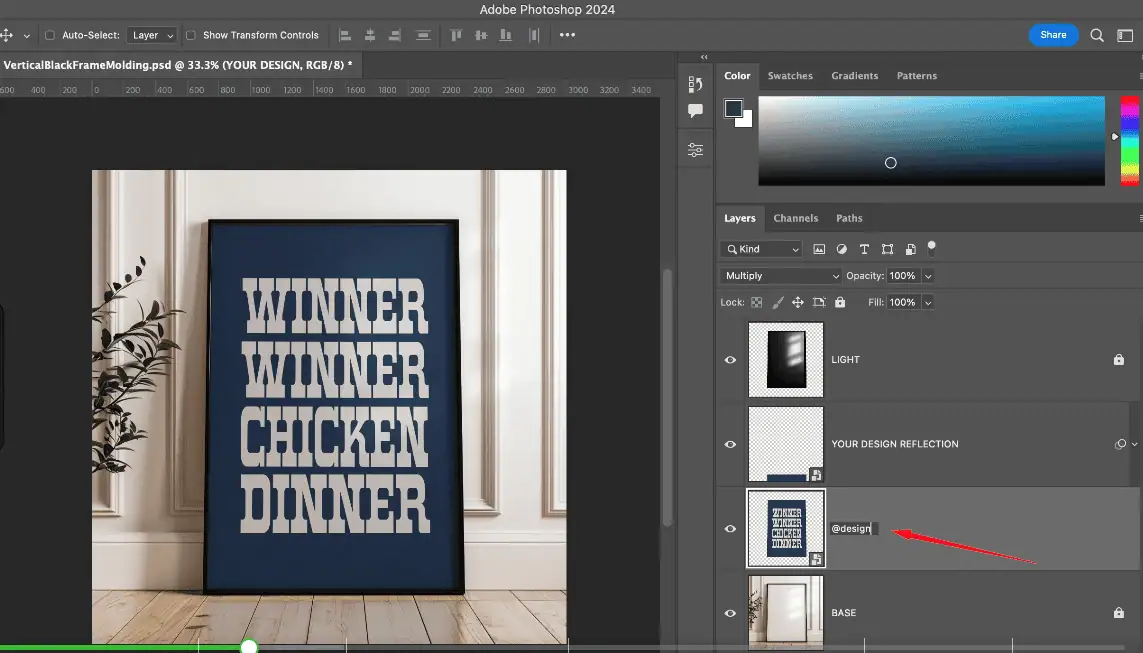
So this one is the autogative sent me.
The autogas quite big and now we have an option I mean it is a very good example like you
see that this particular design does not fit in the exact dimension.
So either you have two options either you could stretch it out or you could enhance this
like this.
This is what you will do.
I am not sure what you use but just to show you we have all the option for the resize
method as well.
So if I close this, this is how this is supposed to add I guess.
So basically this is how you do it manually.
You double click and open the smart object layer and then you expect to add the design and
then save it manually.
Now what bulk mockup comes in is like bulk mockup follows the same process.
The one that you do it manually bulk mockup follows the same process.
The only difference is that it does the process automatically.
So to use this template what we will do is we will rename it as at design by renaming
it.
We now force bulk mockup to work on this smart object layer.
So it will replace this smart object layer.
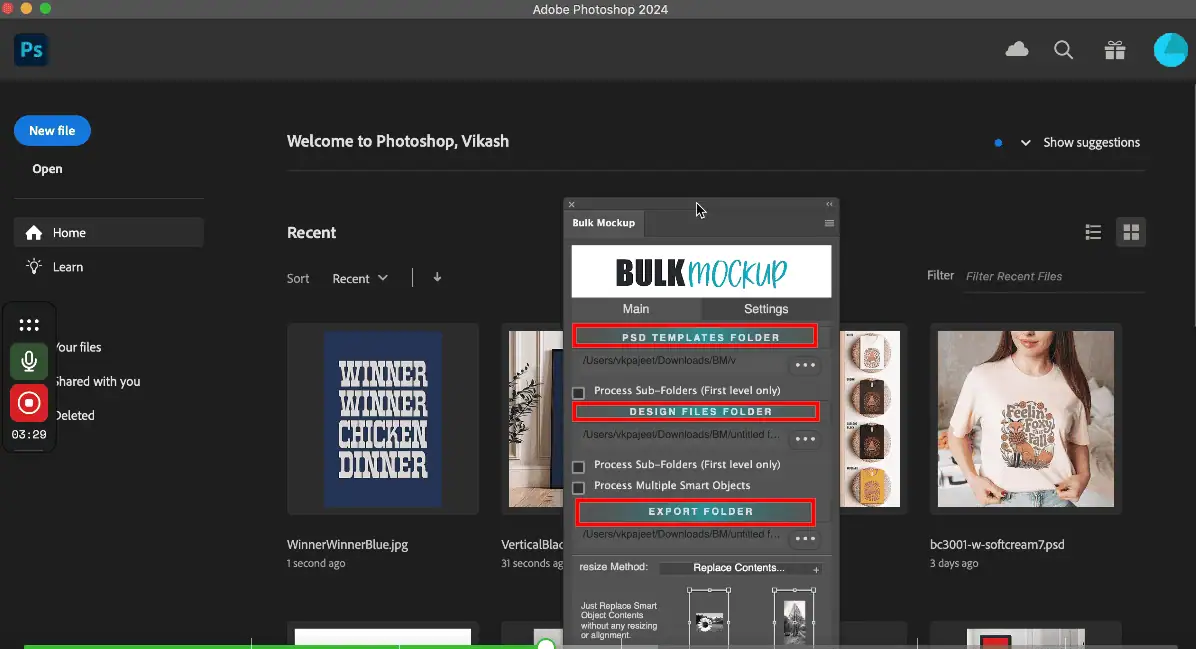
Now I will close this and to use this plugin we need to create three folders.
I mean this is the workflow that I have designed.
So we will name this template.
I will add the template here and then another folder will name it design.
So we already have this design right.
So I will create a couple of copies for this.
So let me try changing the color.
Let us have three.
And I have a green copy and I am mod copy.
So I will close this down.
So if we have three of them, I mean these are big files but basically it would be ideal
if you would use smaller file.
Anyways so let us jump to the plugin.
So using the plugin is pretty straight forward.
It is like use specified three folders over here.
So first is the psd template folder.
Just grow, grab the template folder.
Next is design files folder.
And grow, grab the design files.
And then we have the export folder which I did not create.
Let me go back and create the export folder.
I will name it px.
So I will go and select px.
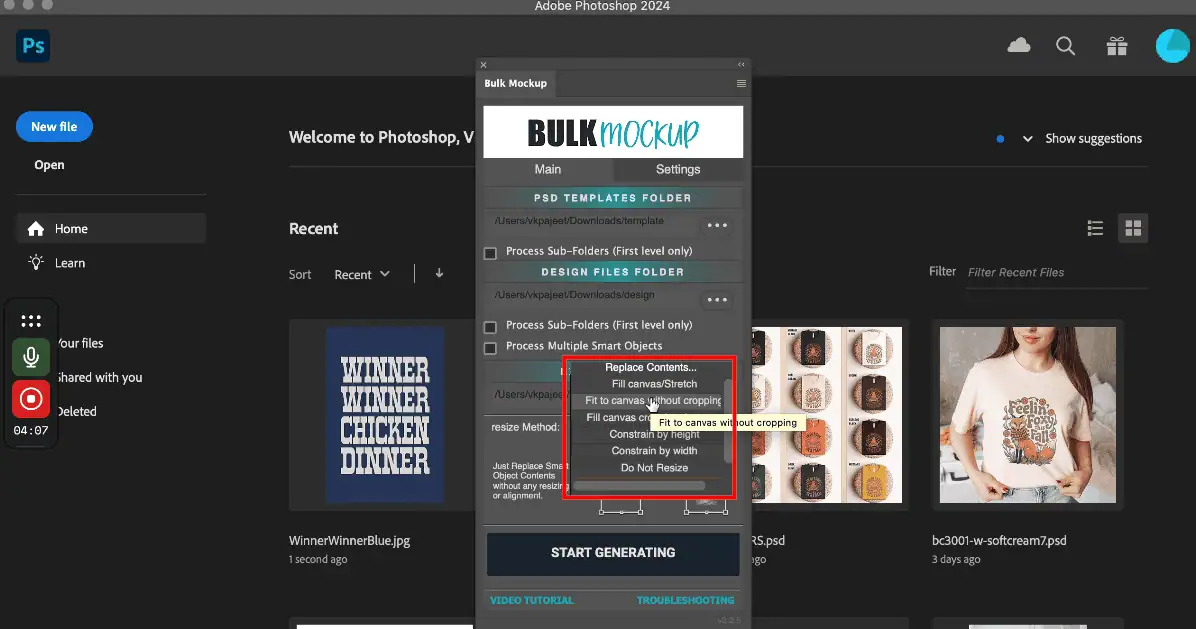
Now over here we have seven different resize method.
The resize method that I just showed you will be fit to canvas cropping the extra.
So it will crop the extra, it will go, I mean there will be some inevitable cropping.
Or if you wish you could choose fit to canvas cropping, you know, stretching.
So without cropping or fill canvas stretch.
So these are different options that you could use.
I will use fit to canvas cropping the extra.
And to add to it if you go to the settings tab and then design layer, you have the option
to align it.
Like you want to crop it from the top or you want to align it from the top.
So you could use this different anchor points and the alignment will be used like this.
So I will keep it center here.
And for this we will have do not scale.
We do not want to scale or design.
And we can uncheck these two options.
So these are advanced feature.
I don’t think you will need them for wallet.
This option is BST template.
So basically if you want to resize your template files like you want all your mockups to be
maybe 1000 in 1000 pixels.
So you could specify it here but let us keep it to not resize.
And then we go to the export option.
So first now the export to subfolders.
So we have three options here.
First is all in export folder.
So all the mockups will be generated on the export folder.
If you want to organize your export into you know subfolder you could select either
PST mockup.
So it will create subfolder as per your PST mockup or you could select design file.
So it will create subfolders as per your design file.
Now files.
So these are the different options that you could choose from and we have MP4.
So this plugin is pretty good at exporting video mockups as well.
So if you have video mockup template you can use the produced video file as well.
So let us keep JPD for this exam.
I mean for this demo.
And then we also have the option to you know custom rename your export file.
So like you mentioned that you need your files to be SEO optimized your subtitles.
So you could use you know design file name plus you could add suffix.
So if you select suffix you could add you know any keywords that you want to add and
these all will be added to the end design file.
And these are the preferences settings so you could save different bulk mockup settings
and that is all.
So now I mean you just hit start generating and you will see the magic.
So it will open up the template, open up this smart object layer, add a design on it
and then export for you all in an automatic manner.
So you see I mean it will stretch it out like a different resize method I think you pretty
much understand this and look that is all done.
So it created you know a self -folded us for all your export I mean different design files
and there you have it.
So I hope this you know pretty much explains how to use it.
Plus you know just go give it a try we have 7 day money back guarantee and you know if
you look at our landing page we are known for our support.
So after purchasing if you ever feel that you need any hand holding or any explanation
you can reach back to us and we will jump on a call and help you sort the.
So yeah thank you.
When you drop your own wall art template into Bulk Mockup, the main confusion is usually around smart objects, design sizing, and how to connect everything so exports run correctly.
This guide walks you through preparing your PSD, setting up folders, choosing the right resize method and alignment, and configuring export settings so Bulk Mockup can batch-generate clean, consistent mockups for you automatically.
Before you automate anything, test it once manually:
If your design does not match the aspect ratio of the frame, decide whether you prefer a little cropping or slight stretching, because that choice determines which resize method you will use later.
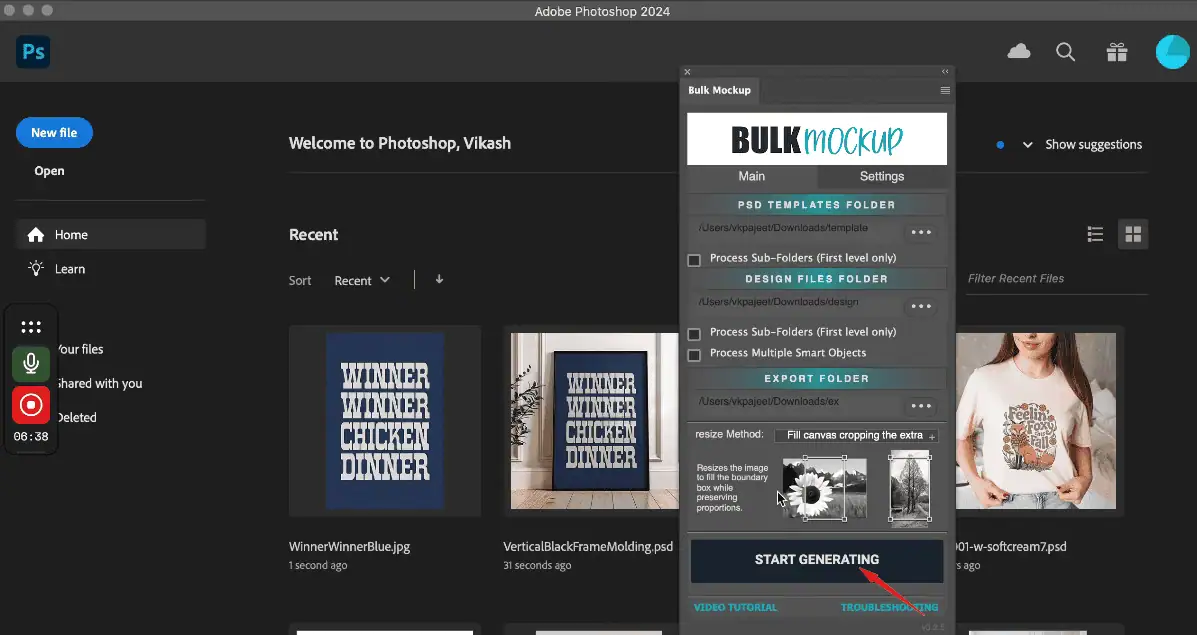
Bulk Mockup expects a simple folder structure so it can loop through your templates and design files without confusion.
Create three folders on your drive:
Name the folders in a way that makes sense for you, such as Templates, Designs, and Exports, or by product type if you manage multiple product lines.
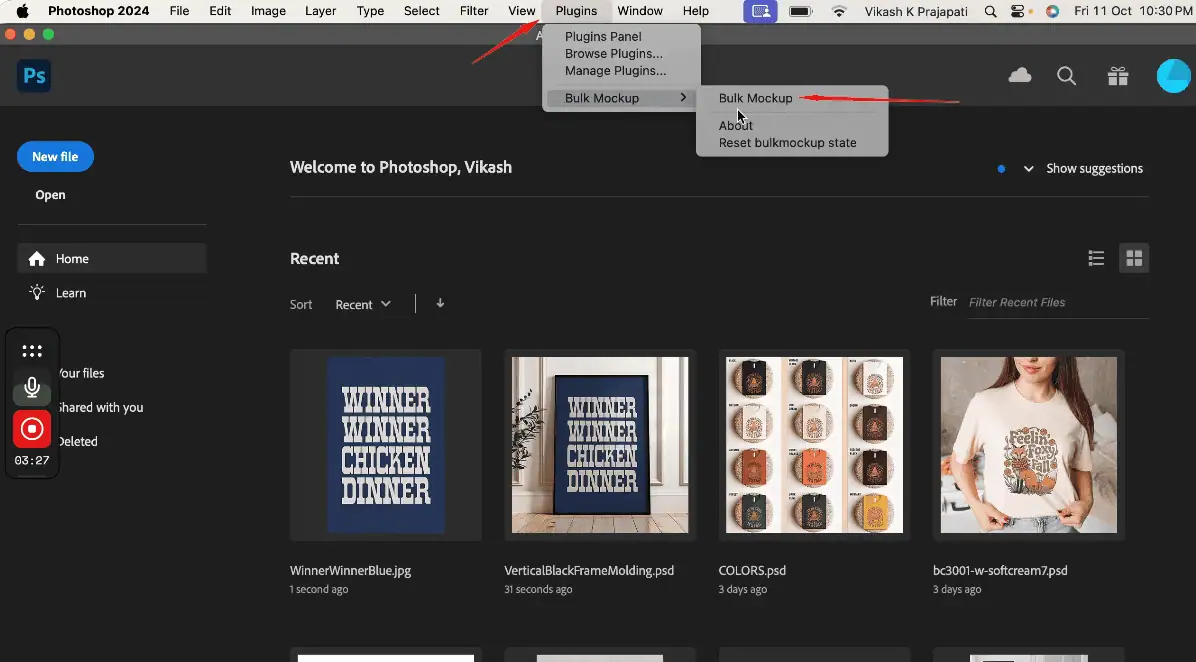
Open Photoshop and launch the Bulk Mockup plugin.
In the main tab:
Once connected, Bulk Mockup can loop through every combination of PSD and design, open them automatically, update the @design layer, and save the output without manual intervention.
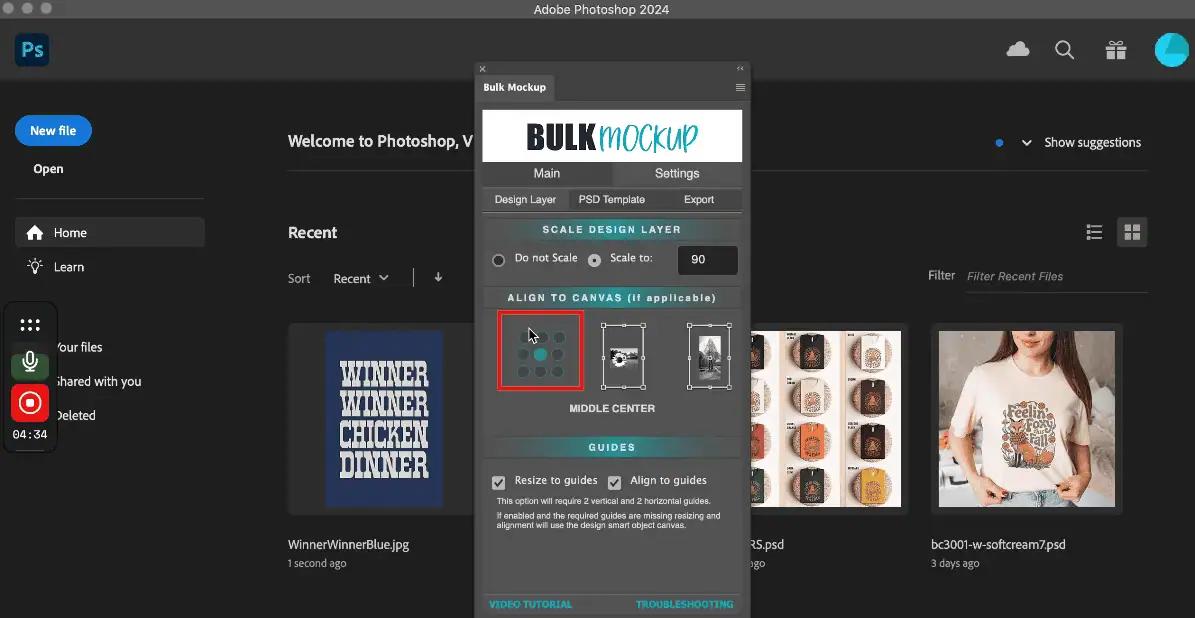
Now decide how your designs should fit inside the smart object frame.
In the resize / design settings area:
Select one of Bulk Mockup’s resize methods. Common choices include:
Then set the alignment/anchor:
If your designs consistently look off-center in exports, adjust the anchor to crop from the top or bottom instead of the middle, then test again with a single design before running a large batch.
In the Export section of the plugin, configure how your files are saved.
Export location structure
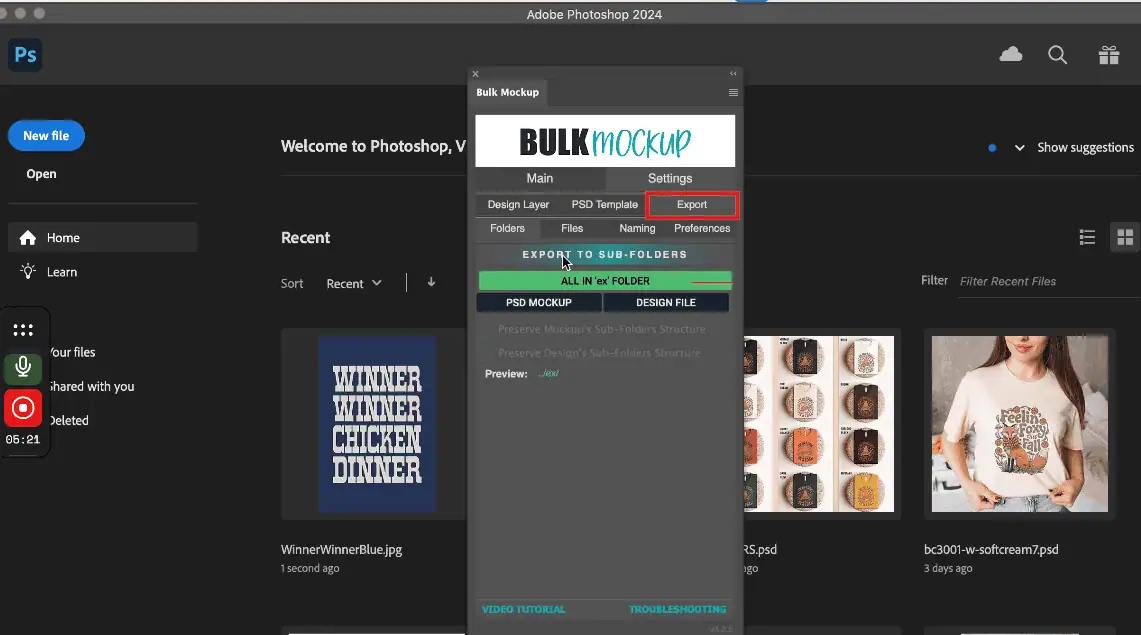
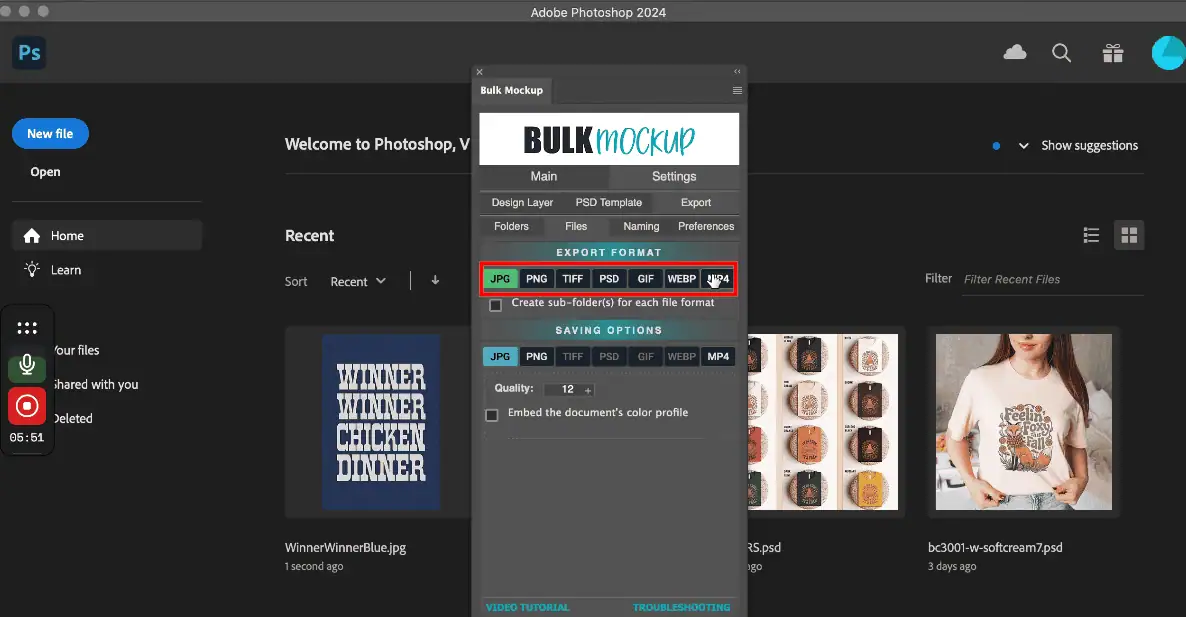
Export file format
Choose the format you need for your store or marketplace:

Once everything is configured:
Bulk Mockup will:
After the batch finishes, open a few exported files from different templates and designs:
Bulk Mockup looks for @design layer smart object name. If it does not find it, it will look for the smart object layer from the top of the layer stack.So naming the smart object @design helps Bulk Mockup identify the layer to work on quickly and avoids updatingthe wrong smart object layer, when multiple smart object layers are present
Use a method that balances coverage and distortion. “Fill Canvas Cropping Extra” fills the frame while cropping edges, while “Fill Canvas Stretch” avoids empty space but can distort shapes. Test both on one design before running your full batch.
Yes. Bulk Mockup can automatically resize designs using seven different resize methods, including options for stretching, cropping, and preserving aspect ratios. Your choice determines whether the plugin crops edges, adds margins, or stretches artwork to fill the frame.
You can export video mockups when your PSD templates contain timeline-based animations. Choose MP4 as the export format, configure export settings, and Bulk Mockup will render video files instead of static images for each design in your batch.
Use subfolder export options and custom naming. Group exports by PSD template or design file, then combine template names, design names, and descriptive suffixes in the naming format to create SEO-friendly, easily searchable filenames for your entire catalog.
