Learn how to convert Etsy JPG T-shirt mockups into Bulk Mockup-ready PSDs in Photoshop using smart objects, guides, and proper layer setup.
How to create a mockup template that will work with Bulk Mockup using simple JPG mockups that you downloaded from Etsy.
The first step is to open all of these JPG t-shirt images in Photoshop.
So I have all of them open in Photoshop.
I’ll go to the first tab.
Now drag and place your design over here.
Where did I download the design?
Let me just check.
Alright, so this is the design. I’ll drag it and place it in Photoshop.
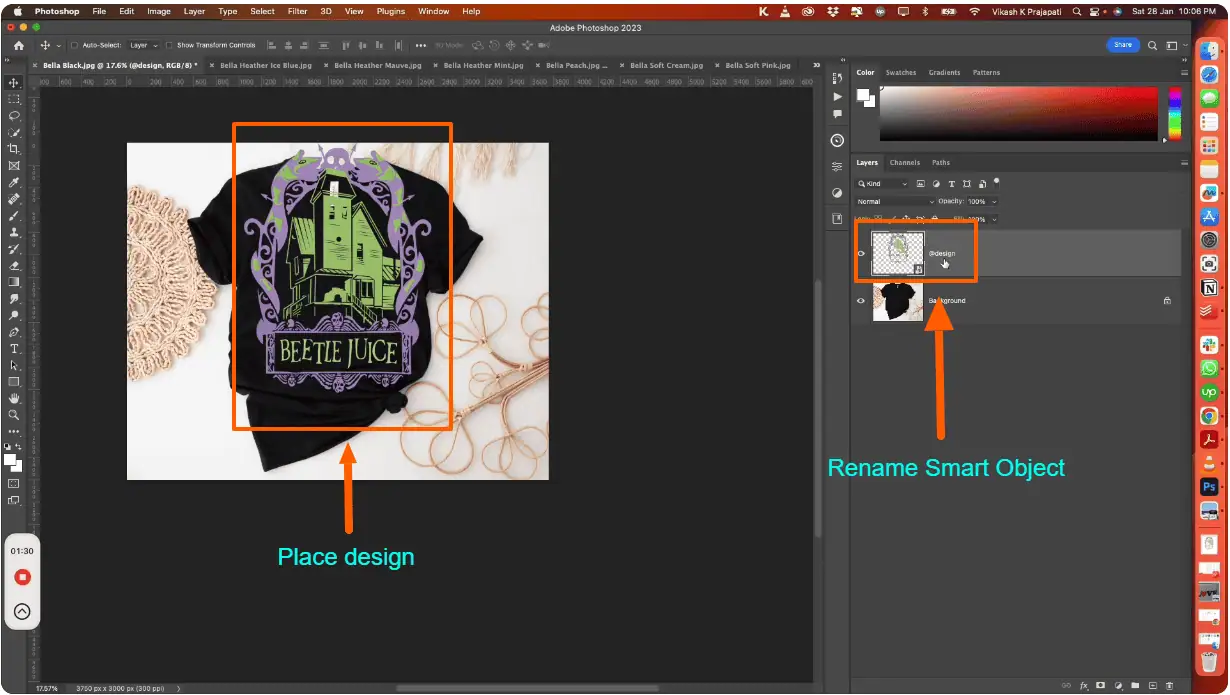
Hit Enter. You can clearly see it’s a smart object, and we’ll rename it as direct-design.
We rename the smart object layer to direct design. This forces Bulk Mockup to work on this smart object layer. This is not required actually. If you have only one smart object, you could go without renaming.
Now we’ll place it in the design area.
Don’t check the design itself. You need to follow the guides — the blue color outline that we have. The reason is, if you see, there are negative spaces around the design.
Let me show you what I mean by negative spaces. If I open the smart object layer, you can see there are negative spaces here and here as well. When Bulk Mockup works, it will ignore the negative spaces and place the design into the full canvas.
So when you place a design, make sure you place it following the guides. Maybe this is too big, so I’ll resize it a bit. Yes, I think this would be the perfect size.
Don’t bother if the design goes beyond the top. We need to follow the center. I hope that makes sense.
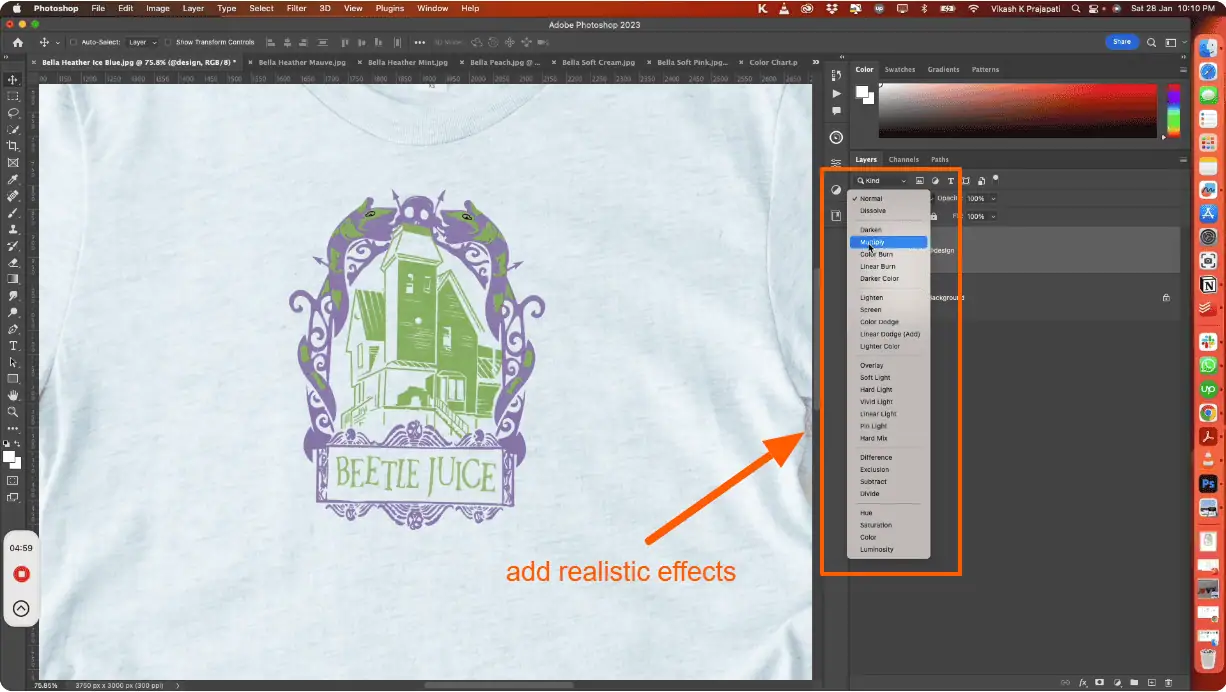
Once it is done, we can change the blend mode from Normal to Multiply.
If we change it to Multiply, and the t-shirt is dark, the design may not show well. In other cases, if we have a white or light design, it will place perfectly.
This depends on your preference. Having it set to Multiply helps the design blend in with the fabric. I’ll keep it Normal for now.
Now I’ll save it.
You don’t need to place your design again. We’ll use a shortcut.
Right-click on the layer, click Duplicate Layer, and you’ll get a popup. Select the other tabs that we have open.
We’ll duplicate this layer on all the other t-shirt files.
I think I’m done with all of them. I’ll close this.
Now press Ctrl + T to transform the element. According to the positioning, you might want to rotate it a bit.
If I change it to Multiply, you’ll see the difference.
This is a colorful design on a bright t-shirt. Look at how it blends into the fabric with Multiply. If I select Normal, it looks like the design is just pasted on. Multiply helps it fade into the fabric.
Multiply works well for this t-shirt.
I’ll click Save and close it.
Again, I’ll select Multiply and press Ctrl + T.
Perfect. Click Save.
Stick till the end of the video — I’ll give you a good tip that will help you handle designs with black t-shirts.
Before trying the black one, let’s complete the others.
Again, you can see how it blends and slightly changes color. This happens because the design is dark. Light-colored designs work better with Multiply. You can decide based on the design type — mono color or multicolor. I’ll leave this one as Normal.
Let’s finish the other ones.
Here we can select Multiply because it’s a bright-colored t-shirt.
We duplicated it twice, so I’ll delete one layer.
We’ll follow the angle where the t-shirt is flat laid. This looks good. I’ll select Multiply.
Save and close.
Now all the files are ready to work with Bulk Mockup.
If you have multiple designs, how do you manage that? It’s very simple. There’s only one trick to remember.
Place your design on one t-shirt. Don’t follow the artwork — follow the blue border and anchor points.
Once you paste one design, always duplicate the design layer. Never bring in a new design file. If you do, it becomes a different smart object, and Bulk Mockup will only work on one layer.
To duplicate:
• On Mac, press Command + J
• On Windows, press Ctrl + J
Another way is to drag the layer onto the plus icon beside the bin.
Now use the Move tool and place it on the other designs.
Repeat the same process and adjust placement for each mockup.
Now I’ll save this as a PSD file.
We created six designs, so we have six layers. When Bulk Mockup replaces one design, it reflects across all layers.
Let me show you quickly. I’ll add a Hue/Saturation adjustment and change the colors.
If I close this, you’ll see all designs update together.
All colors changed.
You can still individually adjust placement if needed. I’ll undo and close this.
Now for this t-shirt, we’ll place our design.
Drag and drop the design, hit Enter, and adjust placement.
This looks good. But if you just paste it, it looks flat and doesn’t follow the fabric curves.
To add realism, change the blend mode to Multiply. It blends better with the fabric.
Now let’s add shadows.
Duplicate the background layer using Ctrl + J and bring it to the top.
Desaturate it using Image → Adjustments → Desaturate.
Then press Ctrl + L for Levels. Increase contrast by moving the black and white sliders inward. This extracts the shadows.
Once satisfied, click OK and change the blend mode to Multiply.
Now we’ll clip it to the design.
Hold Alt and hover between the two layers until you see the clipping icon, then click.
This clips the shadow layer to the design layer, so shadows apply only to the artwork.
If I toggle visibility, you can see the difference.
There are other ways to add realism, like using filters to follow curves, but this is the quickest and easiest method.
I’ll save this.
I hope you enjoyed this tutorial. Drop a comment if you want more cool tutorials.
Thank you so much.
If you download simple JPG T-shirt mockups from marketplaces like Etsy, they won’t work with Bulk Mockup until they’re prepared correctly in Photoshop. The most common issues are designs stretching, misalignment, or Bulk Mockup only replacing one design instead of all.
This guide shows you how to convert flat JPG mockups into a proper Bulk Mockup-ready PSD using smart objects, guides, and layer duplication. By the end, you’ll have realistic, reusable t-shirt mockup templates that Bulk Mockup can process reliably in bulk.
Open every T-shirt JPG mockup you want to use as a template.
Make sure all files stay open during setup so you can duplicate layers across them.
Drag and drop your design file onto the first T-shirt mockup.
Rename the layer to something clear, such as @design
Renaming helps Bulk Mockup detect the correct layer, especially when multiple smart objects exist.
Position your design by following the blue transform guides, not the artwork edges.
Bulk Mockup ignores transparent space and fills the smart object canvas correctly during replacement.
Decide how the design should interact with the fabric.
Dark designs on dark shirts may look too faint in Multiply. Always preview both modes and choose per mockup.
Do not place the design again manually on other files.

This ensures every file uses the same smart object layer structure.
When creating multiple placements in one file:
Bulk Mockup can only replace one smart object source correctly, so duplication is critical.
To make designs look less “pasted on”:
This applies fabric shadows only to the design, adding instant realism.
Save every prepared file as a PSD.
When Bulk Mockup replaces the design smart object, all duplicated layers update automatically, confirming the template is ready for bulk processing.
Check this guide to understand how to create a mockup in Photoshop manually.
These small steps prevent 90% of Bulk Mockup replacement issues.
Yes, but only after converting them into PSD templates with a properly placed smart object. Bulk Mockup cannot replace designs in flat JPG files without a smart object layer prepared in Photoshop first.
This happens when multiple smart objects are imported separately. Bulk Mockup can only control one source smart object, so all designs must be duplicated from the same original layer.
Renaming isn’t mandatory if only one smart object exists, but it’s strongly recommended. Clear naming avoids confusion and ensures Bulk Mockup targets the correct design layer every time.
No, Multiply is optional. It helps blend designs into fabric texture, especially on bright shirts. Choose Normal or Multiply depending on your design colors and the shirt background.
This usually happens when aligning to visible artwork instead of transform guides. Transparent space inside the smart object affects placement, so always align using the blue guide outlines.
