

Selling printable wall art on Etsy can be lucrative and fun until you encounter the confusion. How to size printable wall art for Etsy? If you’re a new seller, you might also wonder:
Getting these wrong can lead to customer complaints, refunds, and stress
In this comprehensive guide, we’ll clear up the confusion and show you exactly how to size your printable art files for Etsy using just six aspect ratios to cover 95% of common frames.
We will also demonstrate how the Bulk Mockup Photoshop plugin can automate batch resizing and mockup generation, saving you hours.
Before diving in, let’s examine the common mistakes that newbie Etsy sellers make with wall art.
One of the biggest reasons buyers leave bad reviews is that their prints come out blurry or pixelated. This usually happens when sellers upload artwork that isn’t truly high resolution.
Remember: if you’re advertising a 24″x36″ printable, your file must actually be designed at that size and at 300 DPI. Shrinking file size by over-compressing to “fit Etsy’s limit” can backfire, making your design look fine on screen but terrible on paper.
New sellers often think they’re being helpful by uploading 10–20 different file versions. In reality, this overwhelms buyers. Most customers don’t understand which one to pick, and you increase your chances of making a mistake.
Successful shops keep it simple with around 5–7 files in the main aspect ratios and include a quick size chart that tells buyers exactly which file to use for their frame.
Trying to force your design into every frame size by stretching it is a rookie error. It makes people, text, or patterns look “squished” or oddly elongated — instantly unprofessional. Instead, you should respect aspect ratios.
If your art was created for a 2:3 aspect ratio, don’t simply stretch it to 4:5. Instead, use cropping, padding, or Photoshop’s content-aware fill to adjust the design properly without warping.
Etsy only allows files up to 20 MB each, and a maximum of five files per listing. If your high-resolution artwork is too large, it won’t upload, or Etsy may secretly compress it. New sellers often panic here.
Either adjust export settings slightly (without losing quality), split files across the five slots, or upload a small PDF with clear instructions to make this method buyer-friendly.
What looks perfect on your monitor doesn’t always translate into a good physical print. Many new sellers skip testing their files, only to find buyers complaining later.
Always do a quick 100% zoom check in Photoshop or even print a smaller test version at home. If fine details, lines, or text look fuzzy, they’ll look even worse when blown up to poster size.
Even if you’ve uploaded the right files, many customers don’t know which one to use. That leads to endless questions, confusion, and sometimes refund requests.
Include a mini guide or chart in your listing (or as a bonus PDF download) showing which file size matches common frames. When buyers feel guided, they’re more confident in using your files.
Some sellers upload only PNGs, thinking “bigger is better.” But PNGs can quickly blow past Etsy’s 20 MB limit, and they’re not necessary for most printable art.
The industry standard is high-quality JPEGs at 300 DPI, or sometimes PDFs for certain sizes. Stick to formats that balance quality and file size, and make sure you mention in your listing what buyers will receive.
To avoid all these pitfalls, understand the basic concept of aspect ratios of wall art designs. This key concept will help you sell wall art designs in perfect shape.
Aspect ratio is the proportional relationship between width and height (for example, 2:3 means width is 2 units, height is 3 units).
When you change a file’s dimensions, preserving the ratio ensures that the image doesn’t stretch or distort. If you force it into a different ratio without adjusting thoughtfully, parts may get cut off, or the image may look warped.
Working in a handful of standard ratios lets your art fit many frame sizes without distortion and with minimal cropping or blank space. This is one of the reasons you need to provide your wall art in different aspect size ratios. Let’s find the other reasons.
These pointers not only explain why sellers should provide different aspect ratios but also make it clear how doing so saves time, prevents mistakes, and creates a better buyer experience.
Buyers often take your file to local print shops or online printing services. These services rely on a handful of standard dimensions (like 8×10, 16×20, A4, A2, etc.).
If your artwork isn’t available in those ratios, customers may have trouble printing without awkward cropping or stretching.
Customers want to walk into a store like IKEA, Target, or Hobby Lobby and easily find a frame. If your file is an odd size (say 3×15 inches), they’ll struggle to frame it, and frustration could lead to a refund.
Sticking to the six major aspect ratios ensures your art fits the most common frames available worldwide.
When you create artwork in the largest dimension of a ratio (e.g. 24×36 inches for 2:3), buyers can easily scale it down to smaller sizes within that same ratio (16×24, 12×18, 8×12). This means you don’t need to design every size separately, just the main ratios.
When files match standard frames, customers know exactly what to do. You’ll save yourself from constant Etsy messages like, “Which file do I use for my 11×14 frame?” or “Can you resize this for me?” A clean set of ratio files reduces confusion and improves customer satisfaction.
Providing all standard aspect ratios shows buyers you know what you’re doing. It signals professionalism and makes your listings look polished compared to shops that upload random, mismatched sizes. This credibility often translates to more sales and better reviews.
Here is a recommended aspect ratio list for you to follow.
This clean table explains the ratio and common print dimensions in both inches and metric for your reference. Use these as your “master files” rather than listing every single size variation.
| Ratio / Name | Common Print Sizes (Inches) | Common Print Sizes (Metric / mm approx) | Notes & Use Cases |
| 2:3 | 4×6, 8×12, 12×18, 16×24, 20×30, 24×36 | ~10×15 cm, 20×30 cm, 30×45 cm, 40×60 cm | Great for classic vertical/horizontal “poster” type frames. |
| 3:4 | 6×8, 9×12, 12×16, 15×20, 18×24 | ~15×20 cm, 23×30 cm, 30×40 cm, 38×50 cm | Slightly taller proportions. |
| 4:5 | 4×5, 8×10, 16×20, 24×30 | ~10×12.5 cm, 20×25 cm, 40×50 cm, 60×75 cm | Very common in photo printables. |
| 11×14 | 11×14 | ~28×35 cm | This is more of a fixed dimension “family.” |
| ISO (A-series) | A4, A3, A2, A1, etc. | 210×297 mm, 297×420 mm, 420×594 mm, 594×841 mm | Useful for European/customers. |
| 5:7 (50×70 cm/5×7 in) | 5×7, 10×14, 50×70 | ~12.7×17.8 cm, 25×35 cm | A less common but still used ratio — sometimes used to cover poster-style art. |
Jennelle Lynn Art suggests that if your original art ratio doesn’t perfectly match the print ratio, mild cropping may occur (e.g. trimming edges of background). That’s acceptable if done carefully.
You can download this Etsy aspect ratio explainer for free to avoid mistakes and resize your wall art designs easily.
Now that you know which aspect ratios matter, the next challenge is how to actually resize your artwork to each ratio without warping or cropping it weirdly.
We will look into five wall art resizing methods done manually.
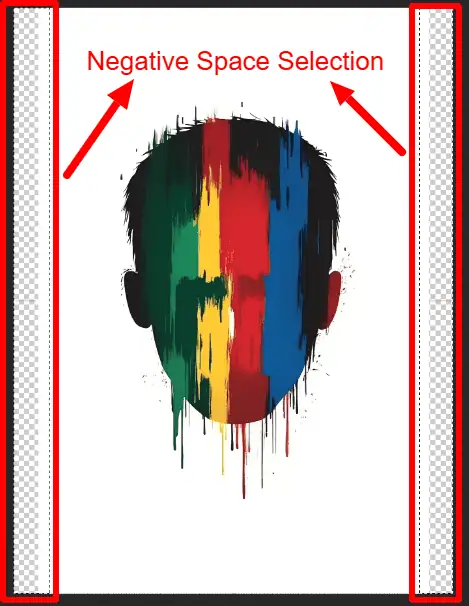
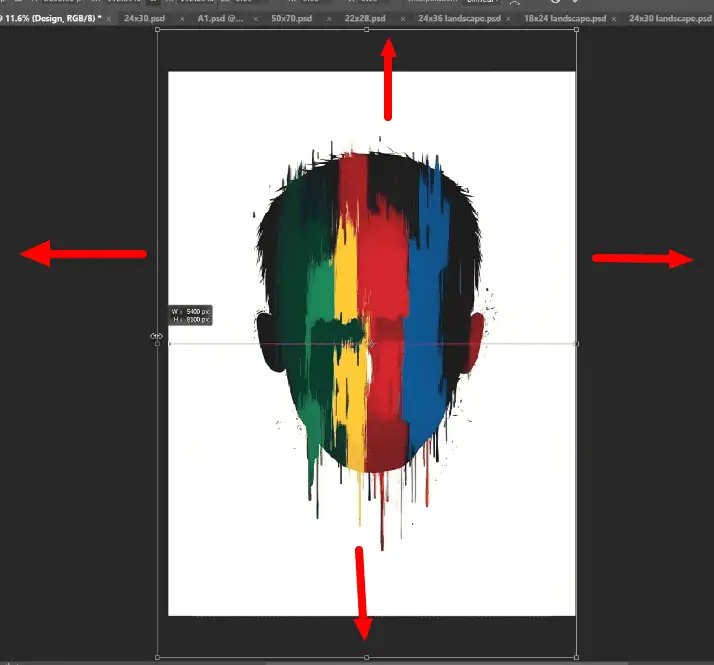
To fill the negative space, hold Shift on your keyboard and drag the artwork to meet the frame ends.
However, this method will distort the artwork.
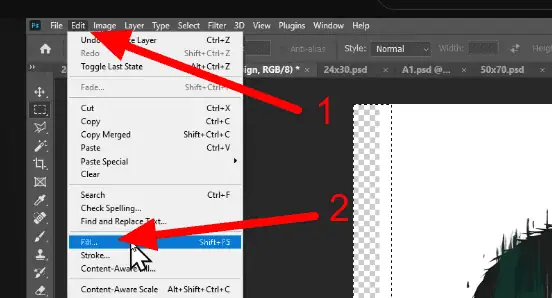
Deselect the frame and select the negative spaces around the wall art design.
Next, go to ‘Edit’ and select ‘Fill’.
A new option panel will appear. Click on the drop-down menu and select ‘Content-Aware’. Click Ok.
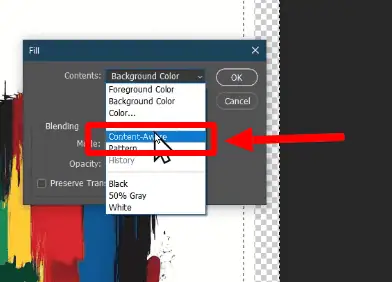
This option will fill the negative spaces with similar content to the artwork. You can also use Generative Fill with Photoshop AI.
Go to the Adjustment Layer option in the right corner of your Photoshop Window. Select ‘Solid Color’.
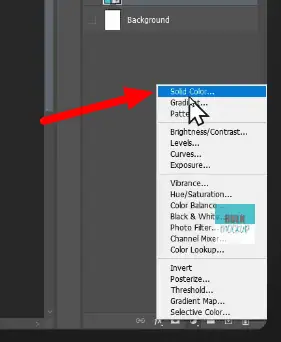
A color panel will appear. Select the matching border or padding color.
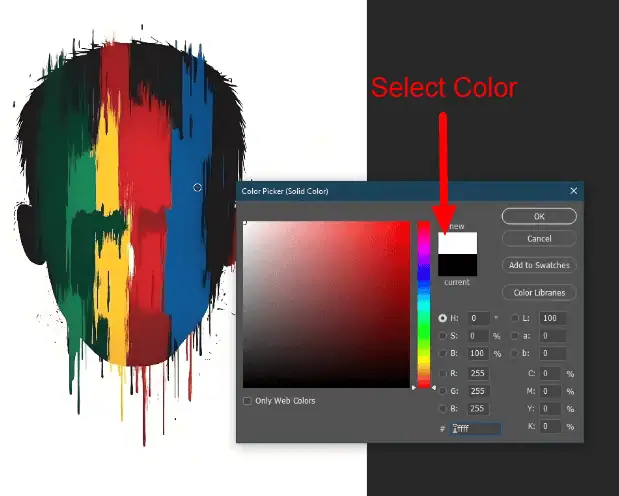
This method will work only when your artwork has solid colors in the borders.
Duplicate the artwork twice.
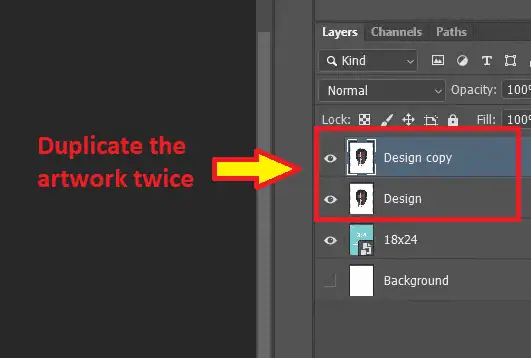
Move the duplicate artwork to either empty or negative spaces. Cover them.
This method is suitable for complex artwork or those with solid colors in the boundaries.
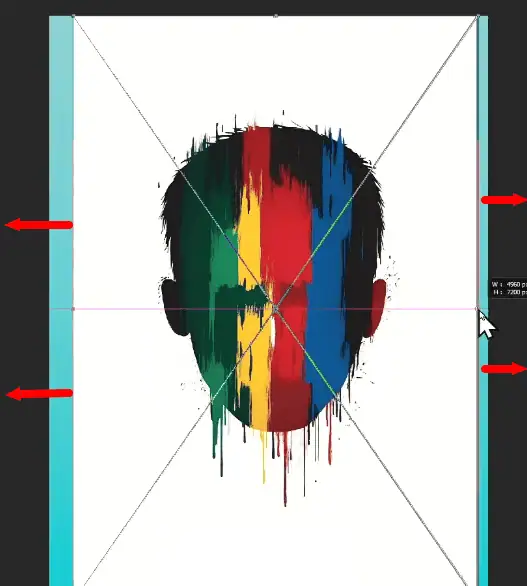
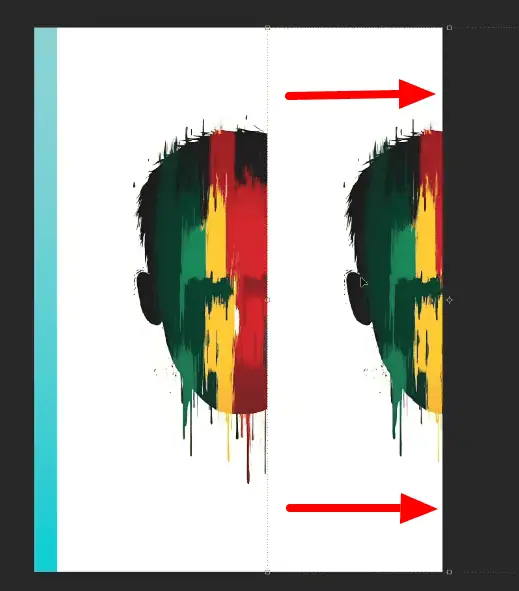
Hold the center constant and drag both sides of the artwork to fit on the frame layer.
This method will not distort or change the originality of the artwork. However, the border parts of your artwork will remain out of the frame.
To know these resizing methods in detail, read our comprehensive guide. If you are a visual learner, check out this YouTube tutorial.
Let’s learn how to use a Photoshop template to change the aspect ratio automatically and more quickly.
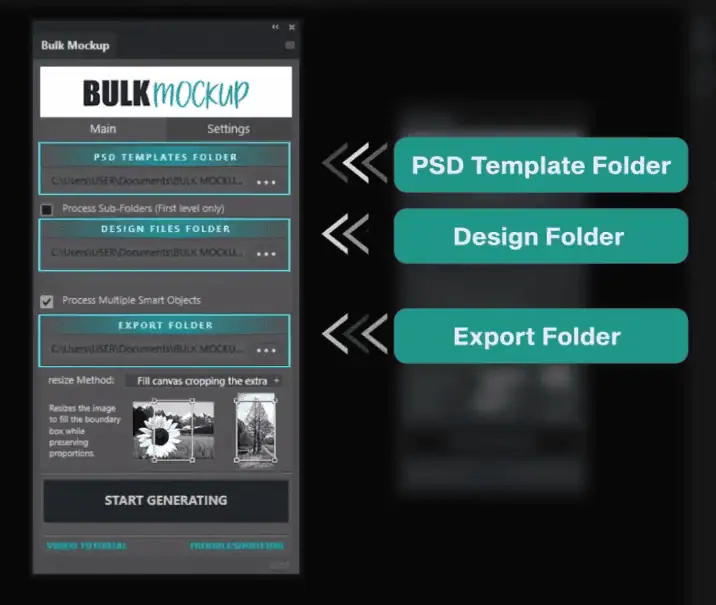
Bulk Mockup, a lightweight Photoshop plugin, automatically pulls designs from a designated folder, puts them on the smart object layers, and creates mockups without manual intervention.
It can create 1000+ mockups in just 10 minutes. You can use this plugin to resize or change the aspect ratios of your wall art designs. Here is what you need to do.
Click on this link and get the free aspect ratio templates. In this folder, you will find both portrait and landscape templates.
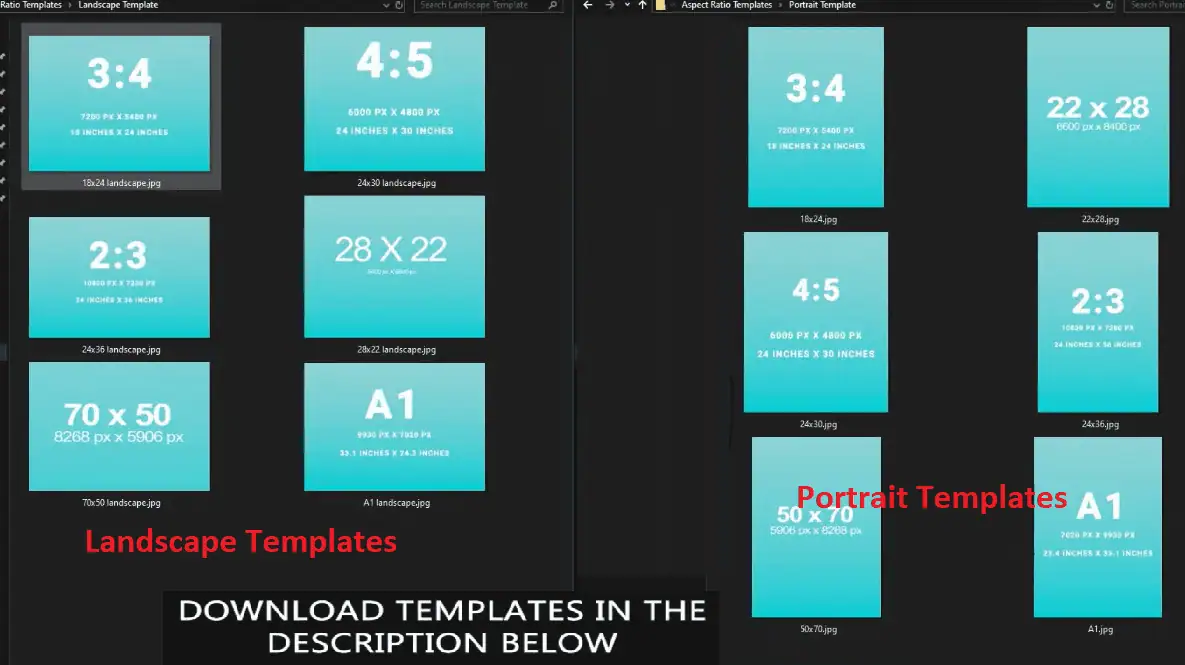
For this demo, we will use the portrait aspect ratio templates for resizing wall art designs. Download and save them in a folder named ‘Templates’.
Create a wall art design folder and store your artwork there. For this demo, we will use a design with a 2:3 aspect ratio.
Your two folders, one for the wall art design and another for portrait templates, are already there. Create another folder named ‘Export’ where all your complete wall art designs will be stored.

You are now ready for the next phase.
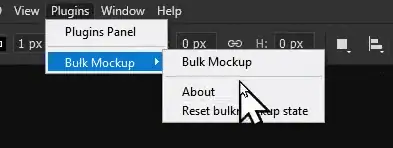
Open Photoshop, go to the Plugin Panel and select Bulk Mockup.
Connect each folder with the Bulk Mockup UI in the respective locations.
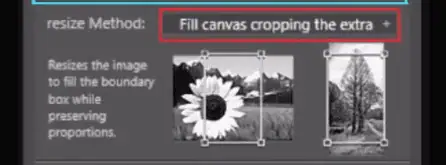
Go to the resize method section below the export folder option. Select the ‘Fit canvas cropping the extra’ option from the drop-down menu.
Once all the features are set, click the ‘Start Generating’ button below.
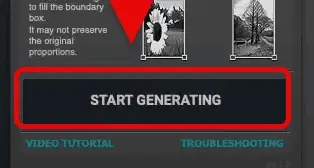
Bulk Mockup will place your wall art design on the PSD templates and alter the aspect ratios automatically. Once done, each altered design file will be exported to the designated export folder.
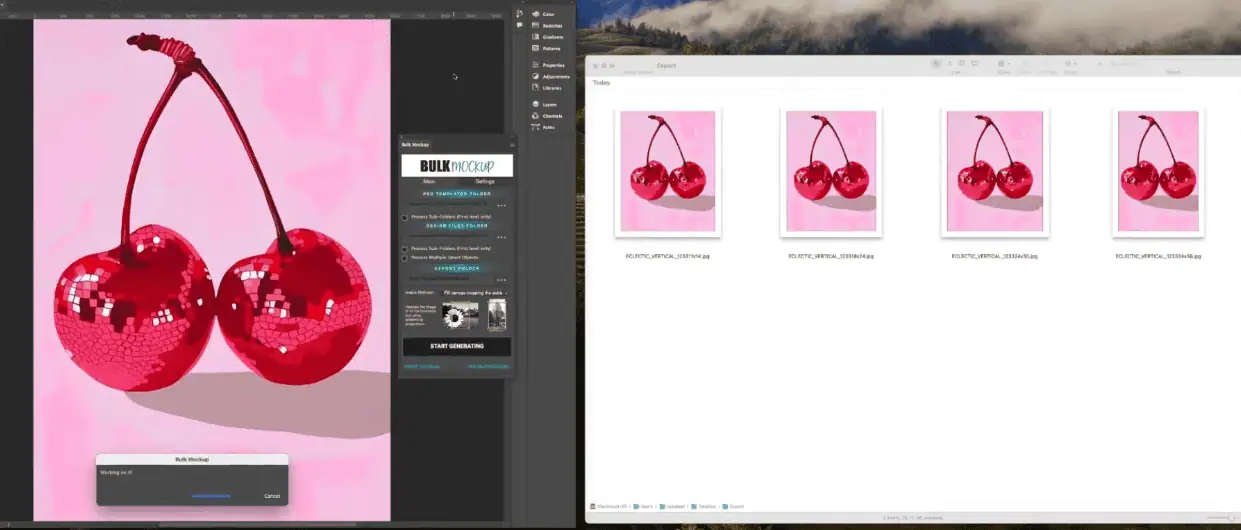
Within 20 seconds, your wall art design will be resized and exported automatically.
This way, you can size your wall art designs in minutes without losing quality and features. Stop grinding manually and use your precious time to create more wall art designs.
See how 5,000+ POD sellers automate their entire mockup workflow
Discover the automation advantageWall art sellers on Etsy often struggle to check pixelated images on their screens. For this, you need to check your screen resolution.
Check your screen monitor size in the specification section of your PC. You can do it by visiting http://screen-size.info/ to check it directly.
Find out your screen’s diagonal size (in inches) and resolution. For example, you might have a 24-inch monitor at 1920×1080.
Open your artwork file on that monitor and set the zoom to 100% (in Photoshop, hitting View -> 100% or shortcut Ctrl+1 on Windows, Cmd+1 on Mac).
At 100%, one image pixel equals one screen pixel, so you’re seeing the artwork at its actual print size relative to your screen. If the image is larger than your screen, you’ll only see part of it at a time.
Scroll around and zoom in one step further (like to 200%). If the image starts to look pixelated at that zoom, zoom back out to 100%.
Essentially, 100% is typically the crisp view; any zoom beyond that, if it gets blurry, means you’re beyond the image’s resolution. So 100% is a safe max in terms of clarity.
While at 100% zoom, use the scroll bar to see how many full-screen lengths tall (or wide) the image is. For example, on a 1080p monitor (approx 13.5 inches tall), perhaps the full image is 3 screen-heights tall when viewed at 100%.
If one screen height is, say, 34 cm (about 13.5″) in real life, and you scroll 3 times to get through the whole image, then the image’s actual height is ~3 × 34 cm = 102 cm in print at 300 DPI.
Now you know roughly that this file can print up to about 102 cm tall. If the largest frame size you advertise is smaller than that (say your largest is 24″x36″, which is ~91 cm tall), then you’re in the clear – the file can handle it with room to spare.
If your file’s max print size came out to be less than the largest you planned, you should downsize your advertised dimensions to avoid quality issues. It’s better to promise slightly smaller prints that look sharp than oversized prints that will disappoint.
You can offer the next size down that’s safe, e.g. if 180 cm was too large, maybe 135 cm tall is fine.
Now you have your files prepared and optimized. Before you upload them to Etsy, make sure they’ll meet Etsy’s file size limits. Check out this tutorial to understand Etsy file size limits and how to keep your mockups within them.
Before publishing your listing, double-check that each file is under 20MB and opens correctly. Focus on a few standard aspect ratios and use high-resolution 300 DPI files.
Leverage templates or Bulk Mockup to confidently offer printables that buyers can use in almost any frame without issues. Implement the automation strategy to size your printable wall art and streamline your workflow to drastically reduce labor, as well as customer issues.
Watch your printable wall art for your Etsy business thrive with far less hassle!
This tutorial shows manual creation, but thousands of Etsy sellers automate this entire process in seconds.
See the automated wayAim for 300 DPI (dots per inch) at the final print size. This is the gold standard for sharp prints. A 300 DPI image means it has enough pixels to print crisply at the intended dimensions. For example, an 8″x10″ print at 300 DPI is 2400 x 3000 pixels.
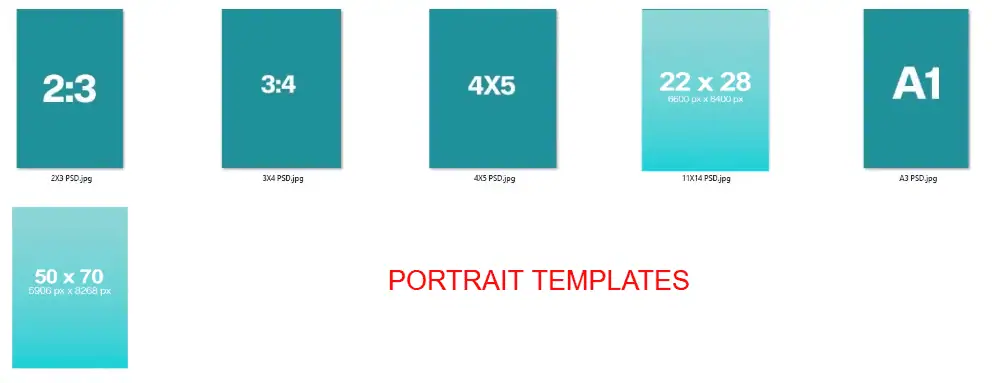
You don’t need a dozen different files – 5 to 6 large files covering key aspect ratios are typically enough. For instance, five JPEGs in 2:3, 3:4, 4:5, 11×14, and A1 (ISO) ratios, plus perhaps a 50×70 cm, will let customers print virtually any common size.
The best approach is to start with a very high-resolution image (e.g. design on a 24″x36″ canvas at 300 DPI) and then test it. Use the monitor method we described: view at 100% zoom and gauge the largest print size that stays sharp.
Also check the pixel dimensions – for a huge print like 24″x36″, you should have around 7200 x 10800 pixels (which is ~78 megapixels). If your pixels count or file size is much lower, that’s a sign it may blur when stretched. Always do a test print at the largest size to inspect quality.
This is common with large, high-DPI files. You have a few options:
1) Compress the file just enough to get under 20MB.
2) Split the file into two parts and use two upload slots.
3) Use a PDF with a download link – upload a small PDF that contains a URL where the buyer can download the full-resolution image from Google Drive, Dropbox, etc.
Photoshop is popular because it gives you precise control over image size/DPI and, with plugins like Bulk Mockup, can batch automate the resizing and mockup generation process.
Many serious sellers do invest in Photoshop + Bulk Mockup because it significantly speeds up workflow by turning hours of work into minutes without compromising output quality.