Learn how to convert nested smart object mockups into normal smart objects for easier editing and smooth compatibility with bulk mockup workflows.
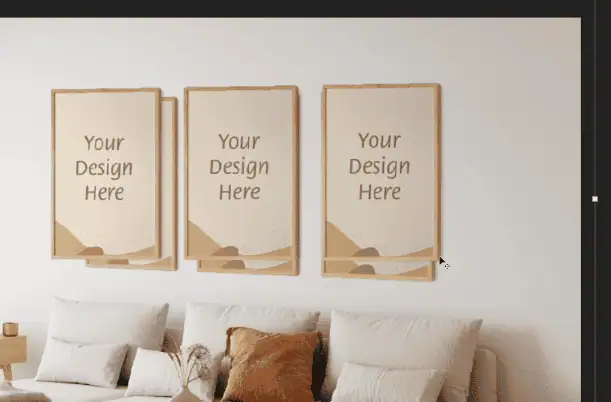
Hi guys, so in this quick tutorial we take a look at this 3 smart object mockup template
and we will convert this from our nested smart object layer to our normal smart object layer
which can easily work with bulk mockup. So to explain you the layer structure
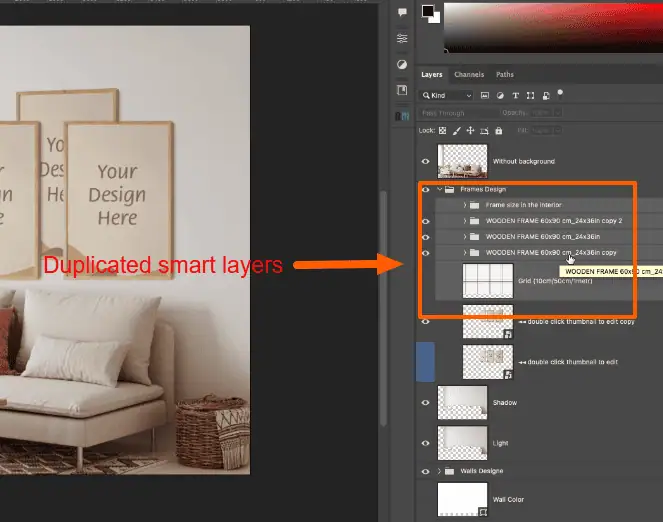
we have this smart object layer frame designs. It says double click thumbnail to edit
when I at double click and open this smart object
we again have a smart object layer. I mean we have 3 smart object layer
and these are nested smart object layer. Again I need to get inside it
and then change our design over here. So we have our nested smart object. This could work with
the latest version of bulk mockup. However we want to change this into our normal
smart object template which will be easy for you to edit it manually for even with bulk mockup.
So how we go about that? So this is the placement of press control T.
This is how it has been arranged. So first I will press control J
this will duplicate the smart object layer and we will have a two copies basically
so that we do not nest around anything. Next is turn off one of them
double click open this now I will copy the entire thing
from this smart object select all the layers all the groups right click
and duplicate it into the main template file. Now we can close this
again we have the original over here and this is the duplicate copy right.
So now these are all the one that we duplicate it. So I will press control T
this out has been arranged. Now we will try to fit in. I will try to fit this
into the exact position of the previous file. So I will go zoom in.
I still have control T. So the anchor points are active. I will take this
and try to place it on the top left corner. Next we need to add some
perspective. So I will click and click on perspective and you can play with
the perspective like this. Yeah this looks nice. I mean it matches the
perspective of the wall. I think this is the perfect placement. Next I will click on
this dot or maybe you can go back to scale, return form and reduce the size.
So just come in together. I mean we need to be very cautious how we place it.
So we have some perspective where we might need to change this perspective and go
forth and back. The best would be you know instead of going with the perspective
I just press the scale and all the settings were applied. Apply to press
control T and you can go to distort. So distort basically we can use all the four
six anchor points and place it anywhere just because we ideally have a
reference frames using distort is much better instead of perspective.
So while using perspective you could not match the perspective of the wall
but using the rest start we can exact place it frames on to the previous frames.
So I will just grab and try to place the frame over here. Then grab this
corner, place the frame over here. This looks weird I understand.
I am but again when we fit everything this will make better sense.
So I think we need to change the size I guess.
We need to be patient and do not worry about the
scheduling that the frames are going. Just make sure that we have a perfect
placement. I think we have a perfect placement in terms of how the previous files
are used. Just take a look. We could merge this up bottom only bottom.
Use the keyboard cursor. Just take a look. I think this is the perfect placement.
If you check this anchor point it is the perspective of the wall
but we could not get it through the perspective option. So use the
distort option. You can click on this one. Now these are all the layers from the
middle. Now we can delete this. We have a perfect placement. Just take a look.
Now we have this artwork layer. Now you can double click on
place everything or just follow the guides that you have with
this markup. I don’t think this will work. This is how you change
the unnecessary smart object into normal smart object. I hope this makes sense.
If you feel the alignment is not proper you can go ahead and press control
key. You can rotate it or whatever the value you want to do. You can do
it. I think this makes sense. Thank you for joining in.
Learn how to take a nested smart object in a wall art mockup template and convert it into a normal smart object layer that is easy to edit and compatible with bulk mockup workflows. This step-by-step guide will walk you through the entire process.
Start by opening your mockup template in Photoshop. Identify the smart object layer labeled frame designs and double-click the thumbnail to open it.
Inside, you’ll notice there are multiple nested smart object layers. These layers need to be flattened into a normal smart object to simplify editing.
Press Control + J to duplicate the smart object layer. Turn off the original layer to avoid confusion, and double-click the duplicate to open it.
Select all layers and groups inside the nested smart object. Right-click and choose Duplicate into main template file. Close the nested file afterwards.
Press Control + T to scale and position the duplicated layers in the main wall art template. Use the zoom and anchor points to ensure they align properly with the original placement.
To match the perspective of the original frame, use the Distort tool. This allows you to adjust all anchor points precisely, giving better alignment than the perspective tool.
Adjust the size, placement, and rotation of the layers as needed. Ensure the artwork aligns perfectly with the previous frames for a clean and accurate layout.
Once satisfied, merge only the bottom layers if necessary and delete unnecessary layers. Double-check the final placement to ensure everything is aligned.
You can rotate, scale, or tweak layers further using Control + T if needed. Your normal smart object wall art template is now ready for easy editing and bulk mockup use.
Nested smart objects are harder to edit and may complicate bulk mockup workflows. Converting to normal smart objects simplifies editing and placement.
While you can use perspective, the Distort tool gives better control for matching frame placement and alignment with the original template.
Yes. Duplicating layers ensures you do not alter the original nested smart object and keeps a backup if needed.
You can fine-tune placement using Control + T, zooming in, and adjusting anchor points or rotation until alignment is correct.
This method works with templates that contain nested smart objects and need conversion to normal smart objects for easier editing.
