Fix stretched or misaligned tumbler designs in Bulk Mockup by using the right templates, single smart objects, and proper resize settings.
Hi guys, so in this video I’ll be deep diving into the process of creating mockups for tumblers. So if you have running a tumbler business and you have purchased bulk mockup, I’ll walk you through the steps so that you can understand each aspect of the process and this will help you get started using the amazing bulk mockup tool. So this file has been sent by one of our customer and he is new to Photoshop and bulk mockup.
So am recording it for him and maybe this could come in handy for all the other users that use cell tumblers. So these are the design files that he has and we have some templates. Okay, so when you run bulk markup. ah
The complaint that I received from the customer is that some of the design gets stressed and at times some of the design only fit into one of the tumblers. So we’ll be opening each of these tumbler mock-up and I’ll be explaining how bulk mock-up is supposed to work and what are the things that you need to take care of. So let us begin with the first one. I think let us deal with these two.
If I open it into Photoshop.
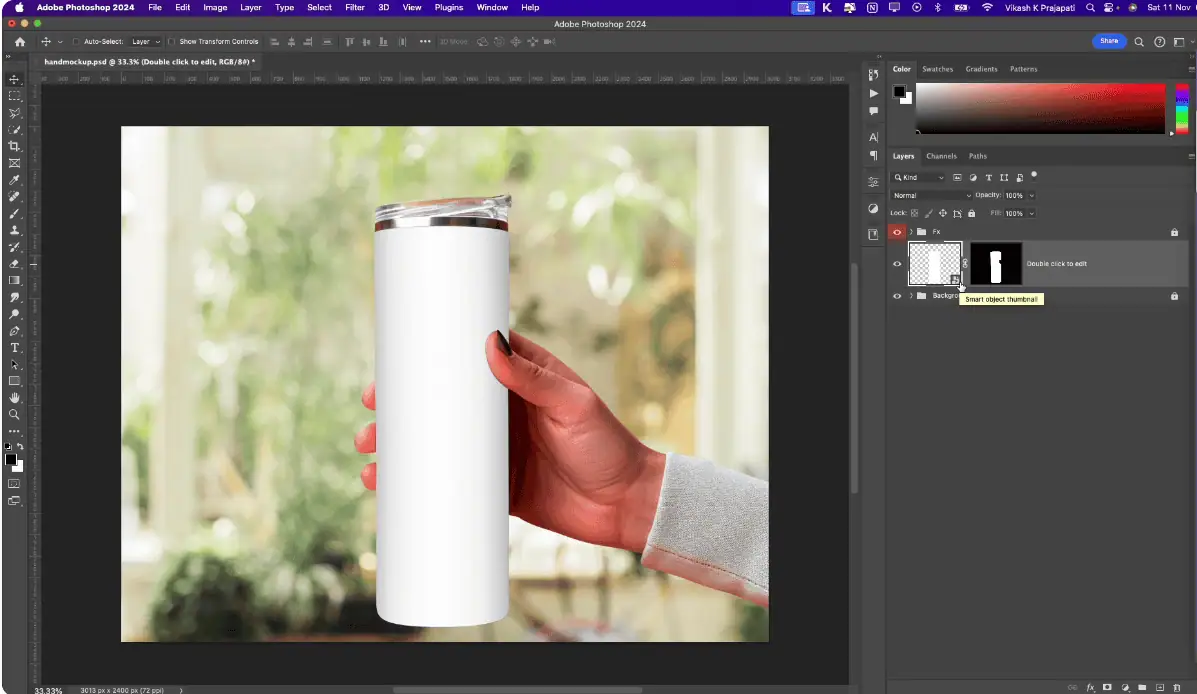
So this is the template and we have a smart object. So we need to focus on the smart object. What bulk mockup actually does, it replaces the smart object with your design file. So once you understand the smart object, it will be handy for all the other things that we are going to manipulate and put the designs into. So this is a smart object. When I open it, you could see this is.
a smart object canvas I could say and it says place your design here the padlock is turned on and we supposed to put any of our design
we are adding this one ok. So we can go and add it and we are supposed to add it something like this I guess.
because we do not want to stretch it.
looks lovely. But the problem is, I could not say problem, but let us take a look at the other templates, then I will talk about what problems we could face here.
If I open this one, the smart object layer, this again is an elongated version of the smart object layer. So ideally when you purchase a mockup template, uh as a buyer you do not have a control on how the smart object has been created. For these two mockup templates, the smart object has been created only for the viewing angle. What I mean is the smart object region is only supposed to be, you know,
placed onto what we could view in the tumbler not the complete wrap. ah At times some creators create the smart object such that you place the complete wrap and they will uh wrap it around the tumbler. But for this case the wrapping is only for the viewing area. So for when you use bulk mockup in this kind of template I will show you what the settings you need to look at it.
So two things to take care of is resize method. The first option is do not resize. There are plenty of resize method. I’ll explain you what we are supposed to do. The first option is fill canvas and stretch. So what it would do is it would open up the smart object layer and place the design. Let me pick up the design. Let us grab this gingerbread. So first option is fill canvas and stretch. So what it will do is it would stretch it out like this.
save it, look how it looks, pretty bad right. The second one is fit canvas without cropping, in this case it will fit in, it has fit in the canvas but it is not cropping, will have negative spaces, so it will come in the center.
And then we have fill canvas cropping the extra. This is what we are supposed to do in this case. So, what it will do is it will fit in the canvas using the smallest size.
drop the extra one out. Whatever we have on the left and on the right, we will drop it out. And if you look, this looks lively, at least it looks like there is a curvature curving around the tumbler. So, this is the setting that you are supposed to use. And along with this, you can also try using, you go to settings, design, you could also try these elements. We have the alignment option to middle left, middle right.
feel right okay so if you want it to be shifted on the left what if you select this one it will pick up the design and then it will
how this single smart object based mockup template looks like. Particularly I am not a big fan of this kind of mockup template because this actually does not illustrate the exact print that you will be printing for the sublimation. What ideally, I mean, there are some templates.
If you are coming from Bailey’s video, you will check those templates that she is promoting. Those templates are not actually elongated or condensed with this size. They are actually the size of the print that will be printing in the sublimation. I think I prefer using those templates. So, it’s personal advice if you have already purchased. These are the settings that you need to follow. Let us move to the other templates and see what we can do.
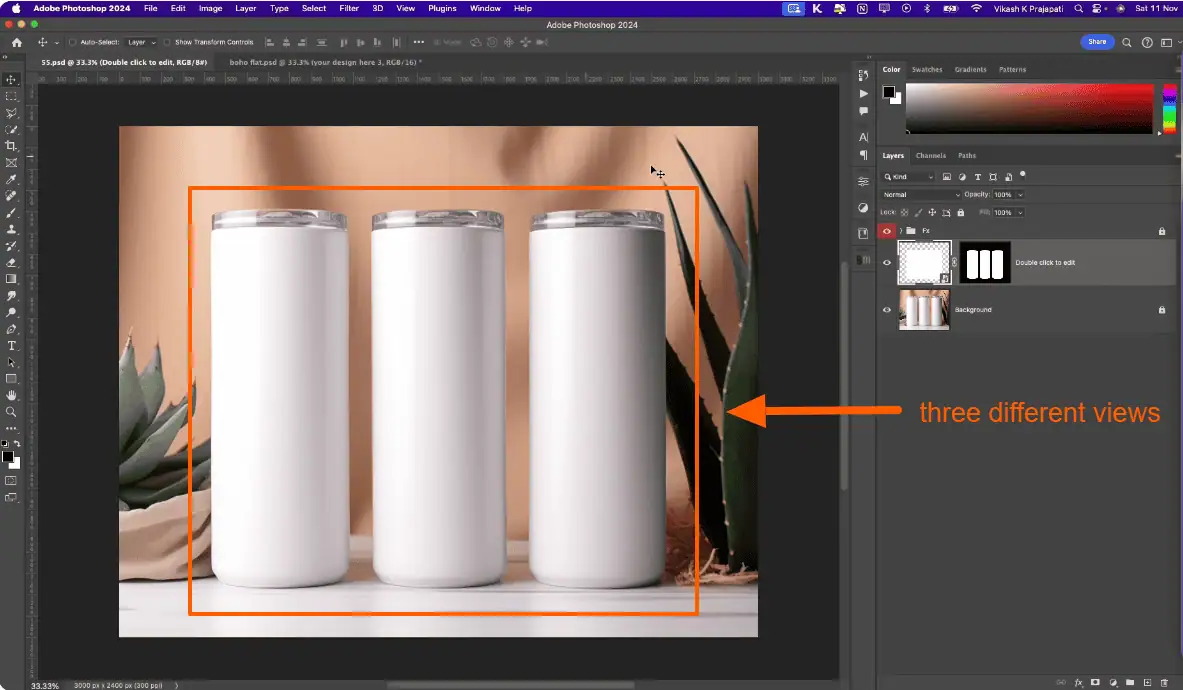
Yeah, so we covered these two templates, now let us cover these three templates.
I guess the templates that he purchased I mean all of them are from the same creator because I can see that’s only you know elongated one.
So basically these three tumblers are three different view of the same tumbler I believe. So the tumblers that I prefer would be something that you change the smart object in one and it would place on all the three. There is a video in our YouTube channel, let me bring that out that you can go and watch.
this video.
Yeah, this one. How to create 3 split mockup template. this will explain how the template should have been set up. uh if I watch Bailey, what… Let me just check.
Yeah, that’s true.
me just check on the motors.
Yeah, if you go to the style product mockups, think they have the best setup of the templates that you know. They have the best template that actually represent the original file in the physical state. So in that case, what we could do is there will be only one smart object layer. You change the smart object layer and that would place it. uh
That would one smart object layer you place the design and it will cover all the three different aspect ratios. For this one to work I mean this is tricky. Why this is tricky? There are three different smart object layers for three different views. So if you want to place this is the I think the right one if you could see this is for the right one. So we first of all we need to use this option that we have which is process multiple smart object layer. When we select multiple smart object layers we could work
on three different smart object layers we need to create three different folders. uh That might sounds a bit complicated and again I’ll ask you to watch this video of our YouTube. me go back. we have a video for multiple smart object layer I’d like you to go and watch that video.
yeah batch replace multiple smart object layer. So go and watch that video to understand the function of that multiple smart object layer. But there’s a catch for this use case. The catch is ideally what we would want is uh same design to be placed on all the three smart object layers.
On the first one, we would like it to be left aligned. On the center one, we want it to be center aligned. And on the right one, we want it to be right aligned, the design file I am talking about. But the problem is if you use multiple smart object layer in bulk mockup, we have the settings of only using one alignment option. So, either you put it on center, if you put it on center, so on all the three different smart object, this mercs, tumblers, the same design will be portrayed, which is what you do not want ideally.
So this use case.
is not possible right now at the current Pulp Mockup feature that we have. So I’ll ask you to avoid this kind of template and prefer templates from what Bailey suggested, styled mockups. I think the same goes for this template as well. No, this is actually what I was talking about. If you talk about this template, this has three different views and the same smart object is linked across all of them. So if we double click and open it, look, this is exactly what we want. We want our template to be so big
so that we could fit in all the exact print that we have, maybe this one.
Save it.
And you see one smart object layer has placed the design into three tumblers. Yeah, all perfectly aligned. So this is what I was talking about. You could find such kind of templates will look properly or before purchasing the template, please ask the buyer that does it have a single smart object or three different smart object. So this would work perfectly. Yeah.
I also, so one more use case that I’ll recommend is, let me see if we have that template.
We will open these two. Let us open these three and this four.
Again, this has again individual smart object layers which we do not want. This would not work with bulk mockup right now. It could work if you use the multiple smart object feature that we have. But again, the alignment would be a big issue.
So if you want the same designs to go, you could use it or you could watch that video how to split it and maybe if you are good with Photoshop, you could create your own templates on the top of it so that it has only one smart object layer and you can place one design. So if you watch that video how to split three mockups, how to create three split mockups that could help you get into it. yeah, the choice is your either edit the template or have it purchase a new one.
This again is a single smart object here. All good. This is a single smart object here I guess. Yeah.
So that’s all about it. think I pretty much explained what to expect and how to process your tumbler. For these two, I think we need to use a different workflow which will have that use fit canvas and crop the extra so that we could place the design at the center and it does not stretch out. And for some of them, first…
For some of them you could use bulk mockup with a single smart object like you always do. I that’s quite simple. But for the ones that has individual smart object clears, that has to be, I we cannot use it right now. So if you have any queries on the top of this video, please feel free to reach out to our support team. We are always there to help you with such kind of tailored screencast videos. yeah, thanks. Thanks for watching this video.
If your tumbler designs look stretched, cropped incorrectly, or only appear on one view when using Bulk Mockup, the issue usually comes from how the mockup’s smart objects are built. Many tumbler templates, especially those purchased from marketplaces, are designed for preview angles, not full sublimation wraps.
This guide explains how Bulk Mockup replaces designs, which resize settings to use, and which tumbler templates work best. By following these steps, you’ll avoid distortion, get consistent alignment, and choose templates that truly work with Bulk Mockup.
Open the tumbler PSD in Photoshop and locate the smart object layer.
Everything depends on the size and shape of this smart object.
Not all tumbler mockups are created the same way.
If the smart object is tall and narrow, Bulk Mockup will stretch or squeeze designs unless the correct resize method is used.
When running Bulk Mockup, pay close attention to Resize Method.
Avoid these options for narrow viewing-area smart objects:
Use this instead:
This fits the design using the smallest dimension and trims excess width, creating a natural curved look on the tumbler.

After selecting “Fill canvas and crop extra,” you can fine-tune placement.
These alignment options help compensate for mockups that only show part of the wrap.
Check how many smart objects the mockup uses.
With multiple smart objects, Bulk Mockup cannot apply different alignments to each view using a single run.
To understand how to create a 3-split tumbler mockup template, check this YouTube video.
If a tumbler mockup has three views and three separate smart objects:
These templates are not recommended unless you manually rebuild them in Photoshop.
The best tumbler templates work like this:
This setup gives accurate previews and works perfectly with Bulk Mockup.
If a template doesn’t meet these requirements, you have two options:
Before buying new templates, always confirm how many smart objects they use.
This usually happens when the smart object represents only a narrow viewing area and the resize method is set to stretch. Switching to “Fill canvas and crop extra” prevents distortion and preserves correct proportions.
For most marketplace tumbler mockups, use “Fill canvas and crop extra.” It fits designs naturally into narrow smart objects while trimming excess width, avoiding stretching and unnatural previews.
Yes, but alignment is limited. Bulk Mockup applies one alignment setting across all smart objects, which makes left, center, and right tumbler views look identical and often inaccurate.
The best templates use a single large smart object linked across all tumbler views. Replacing that one smart object updates every angle automatically and reflects the real sublimation print.
If you’re comfortable with Photoshop, you can rebuild templates into a single smart object. Otherwise, buying templates designed with one shared smart object will save time and work seamlessly with Bulk Mockup.
