Learn how to generate multi-scene wall art videos in Bulk Mockup, fix smart object issues, export MP4s, and use workarounds to create JPGs.
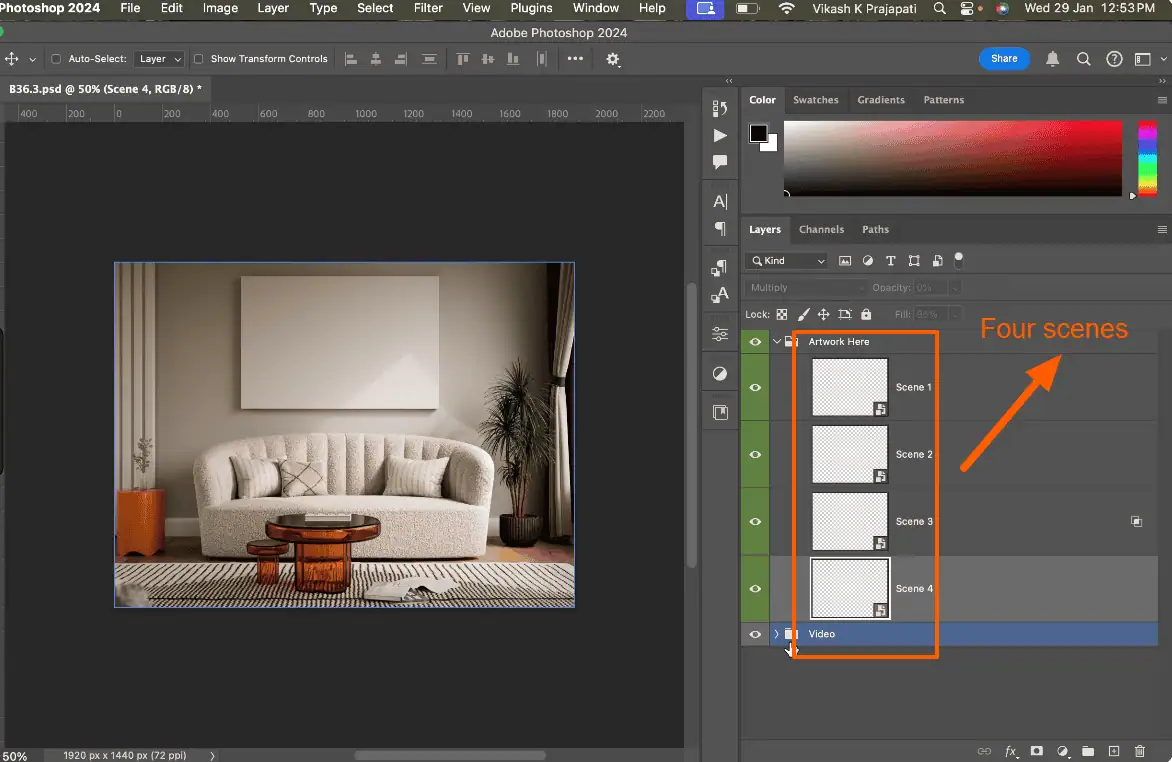
Hey thanks for sending the file. To get this done we have scene 1, scene 2, scene 3 and scene 4 and these are the video. So we’ll be using multiple smart object option from bulk mockup and see how this goes.
Ok so first is scene 1, so I’ll copy this and go to your arrangement that we have done. We have added the template here and then we have the design layer. So I’ll create a folder name scene 1, scene 2 and scene 3 and then we have scene 4 and let me rename it.
So actually this is a youtube thumbnail that I’m using as a design file. Ok so I’ll add this one over here and copy the same thing on all of them because we want the same scene 4 alright.
So we’ll add this scene 1, scene 2, scene 3 and scene 4, 2, 3 and 4. We’ll save this and let us try and see if this works.
template. Then we’ll select the design folder. This is the design and over here we’ll select process multiple smart object. And then we’ll have the export folder. Let me create export folder here.
To canvas, yeah cropping the extra is just fine I guess. We’ll go to the settings. Design there is perfect. PST template do not resize. Folder, export folder. Files we’ll select MP4.
And select MP4 from here. It is set to document for now. So all good. We’ll not set GPT. We’ll select MP4. Naming.
And yeah it’s good to go. Let me just see if this works.
Okay so it’s okay. So it did export. Let me see if it changed. This is the export.
I see that it did change all the four scenes. So let us see.
And exporting video takes time because it uses a lot of resources.
Yeah finally it’s done. Let us see if this worked.
We have scene 1. We have scene 2. And then we have scene 3. And scene 4. All done. So this is how this is. This will work. Okay.
Let me try with the other file that you have. We’ll make a similar copy. So this is the folder.
I’ll copy this. And perhaps you know paste it into the same.
Yeah let us go back and paste it here. Okay.
Come on. Actually I’m using a trackpad. So please see.
Yeah so we have the template here. First you’ll open the template. Just to show you that how to begin from the start.
And then we have these three videos that needs to be linked. Okay.
So whenever you change the location. You are supposed to relink the video. So first is the curtain video.
I’ll relink. I’ll go to downloads. And this is from. Yeah this one. We have the links here.
The first one is curtains. We’ll select the curtain video. Open it up. And I think it will relink all the three.
Because it. I mean all the three videos were on the same folder. Right. We’ll hit on. Okay.
And now. This is the artwork here. I guess. And we are supposed to add only one artwork. Is it. Okay. Now.
Okay. This could have some. You know. Challenges. As in why. Because. We have the multiply here. And the capacity here is 50%.
When bulk marker places the design. The opacity changes to 100%. So you know. Instead of. You know.
Changing the play. Opacity over here. If we do it 100. Let us see what happens. And maybe we could change the opacity here.
To 50%. This is what the output was expected. Right. And then we’ll rename it as. Add design. And it does not have any.
Multiple smart object. I guess. Okay. Now. This is confusing. In the sense. What is the output. That you want. We have different versions of it. We have matte frame. And then we have no matte frame. And then we also have the colorize option. To color. Color the wall. So for now. We want the matte frame. So we’ll rename it to add design. And if you want the no matte frame. We’ll have to.
Uncheck this. Check this one. And then rename it to as. Add design here. So you need to change.
Whatever you want. In that case. You have to rename. Add design there. Okay.
For now. Let us pick up this one. And also. Because.
There are multiple smart object layers. And they are nested inside a group.
I’ll recommend you to. You know. Press ctrl g or command g to duplicate this.
And move this on to the top.
And maybe we’ll have the same name design here.
And change opacity to zero.
So by doing this. What we did is. We made.
The bulk mockups job easier.
Because bulk mockup will open the tab.
Find out the template. And find out the added design.
And it will go about. You know. It will quickly find and replace the design.
Okay. So now.
Again I’ll go back to the bulk mockup plugin.
The template location is the same one.
Design file folder location.
Instead of now. I mean.
We only have one images. So instead of selecting the design folder with multiple folders.
We’ll select any of this folder. Which has only one image.
Right. This is what we want.
And that’s the case. We do not have multiple smart objects.
So I’ll have to uncheck this one.
And rest of the settings will stay as it is.
And yeah. Let us click on start generating.
And we’ll see.
Okay. The opacity.
And they did not work properly.
So we’ll have to.
You know.
Find out a better option.
For that 50 % opacity.
So let us.
Check the output.
And I’ll try to modify the template.
Did we have the output.
Or is it still running.
I did not see the progress bar.
But it looks like it’s still running.
Okay.
Okay.
Yeah.
The other problem that.
I mean.
Yeah.
Let us finish.
And then.
I could talk about the other issue.
That you know.
Was hampering you from.
Creating the video.
So this is the video.
So the only change.
I think is the opacity.
And let me just try it again.
Oh sorry.
That is photoshop.
Okay.
Let us open this template.
And we changed.
We did change this right.
So let me change it back to 100%.
And this was.
Yeah.
The other problem that I see on this template was.
If you look at this.
The smart object.
If I open it up.
This one is a blank.
Okay.
So that is the reason.
I mean.
It is not turned on.
And bulk mock -up.
Might be having trouble.
You know.
Replacing the artwork.
So it might deep.
Throwing some error.
But I guess.
You know.
This is how you will fix it.
You know.
Turn it on.
May change the opacity to 50%.
And then.
I think.
Yeah.
Duplicate empty at the top.
And this is good to go.
So.
I will just click on.
Start generating.
Just to show if the.
You know.
Artwork is perfect.
So if you look.
The saturation is perfect.
Okay.
The other query.
That you had.
Was.
What I understand.
Is that.
I mean.
On this one.
This scene.
B63 36 .3.
There are four scene.
And you wanted.
To export.
GPGs of the four scene.
Right.
And for that.
You know.
I mean.
The support person.
Radhika.
Misunderstood.
What you wanted.
And since.
Noted that.
You have to resize.
I mean.
You have to modify the template.
So I will show you.
How to know.
Go about that one as well.
So.
Let me just check.
The export output.
For this one.
And this is the.
Final output.
I guess this is perfect now.
Now.
Let us go back to.
Your other.
Query that you had.
So.
This is the template.
Right.
So.
The problem.
With this one is.
Because.
Because we cannot modify.
How the.
Plugins.
Bulk.
Sorry.
Window.
This four scene.
Sit on a different.
Timeline.
Okay.
If you look.
This is the end.
And.
You will see that.
These four are.
Setting on a different.
Timeline.
Hence.
Bulk.
Markup cannot.
You know.
It does.
Replace all the scenes here.
But the problem is.
We cannot export.
JPGs.
JPGs.
Always exported.
From the front scene.
Or wherever the scene is.
I mean.
Wherever is the playhead.
Is there.
We cannot change.
The playhead.
Of this.
Video.
So.
Like.
Radhika mentioned.
We have to modify.
This template.
So.
To modify the template.
What we can do is.
You know.
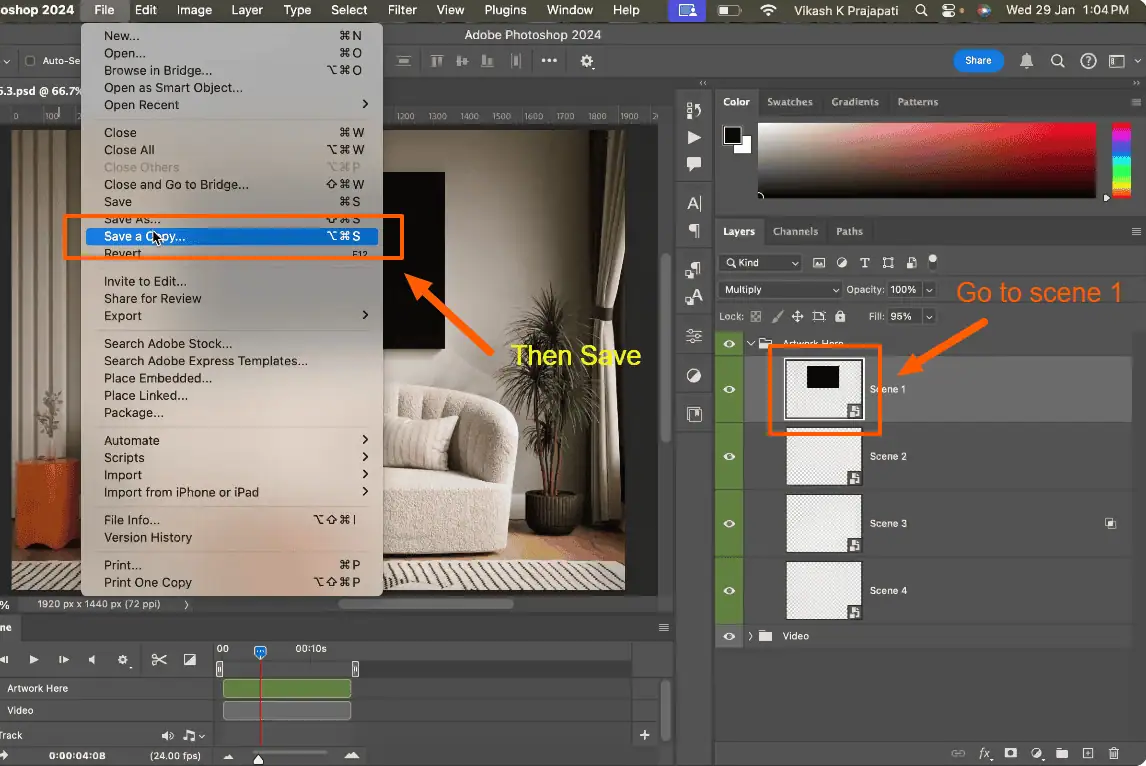
You can save.
Different.
PSD files.
For each scene.
So.
What I mean.
By this one is.
If you look at the video.
Okay.
This is scene one.
I guess.
Let us add.
White color.
Or black color.
This is scene one.
We could create it.
As a.
Save copy.
We can name it.
Scene one.
PSD.
Put the playhead.
Now.
This will be.
Scene two.
I guess.
Likewise.
You will save the file.
For scene one.
And scene two.
I mean.
Scene three.
And scene four.
So.
Now.
These two.
If we open.
Though.
This is a video template.
You could delete the video part.
But both of them.
You know.
By changing the playhead.
We created different scenes.
Now.
You could run bulk mockup.
And create individual jpgs.
Like.
QVT.
For.
Still.
Mockup.
So.
You know.
This is how.
I mean.
The workaround.
That you are supposed to do.
Right now.
We cannot.
Use.
I mean.
All.
Export all jpgs.
Of the scene.
In one go.
Okay.
That is not.
What the plugin was.
I mean.
This is an interesting use case.
To be honest.
We’ll see.
In the future.
If we could.
You know.
Include this.
Feature somehow.
But yeah.
For now.
This is the workaround.
That you have to.
Take care of.
If you’re working with video-based mockups that include multiple scenes (Scene 1, Scene 2, Scene 3, Scene 4), Bulk Mockup can handle them, but only if the template and settings are prepared correctly.
Common issues include opacity changes, designs not updating properly, confusion around multiple smart objects, and difficulty exporting individual JPGs from video timelines.
This guide walks you through the exact workflow for using Bulk Mockup’s multiple smart object feature, exporting MP4 videos, fixing opacity and visibility issues, and applying the correct workaround when you need still JPGs from multi-scene video templates.
Open your prepared PSD arrangement in Photoshop.
This structure is required for Bulk Mockup to correctly process multiple smart objects.
If all scenes use the same artwork:
This ensures consistent visuals across all scenes during export.
Once all scenes and folders are set up:
Saving ensures Bulk Mockup reads the latest structure and layer names.
Open the Bulk Mockup plugin and set the following:
These settings allow Bulk Mockup to correctly process Scene 1 through Scene 4.
Because this is a video-based template:
Video export consumes significant system resources, so expect longer processing times.
Click Start Generating.
If all scenes reflect the new design, the setup is working as intended.
If you open a template and see missing video layers:
Always relink before running Bulk Mockup.

Some templates use Multiply blend mode with 50% opacity.
Important behavior:
To fix this:
This avoids unexpected brightness or saturation changes.
If smart objects are nested deeply:
This makes it easier for Bulk Mockup to locate and replace the design quickly.
If a smart object is hidden or blank:
Hidden or disabled smart objects can cause replacement failures or errors.
Bulk Mockup cannot export JPGs for all scenes in a video timeline at once.
This is a limitation of video-based PSD timelines.
To export JPGs for every scene:
Each PSD now represents a single still scene.
Once split:
This is currently the only reliable method for generating JPGs from multi-scene wall art video templates.
Because each scene uses a separate smart object. Without enabling this option, Bulk Mockup will replace only one layer, leaving other scenes unchanged.
Bulk Mockup resets design layers to 100% opacity during replacement. Any transparency should be controlled structurally, not through opacity settings on the smart object.
JPG export depends on the video playhead position. Bulk Mockup cannot move the playhead, so only the active scene can be exported at a time.
Ensure all smart objects are visible, enabled, and not empty. Turn on hidden layers and confirm opacity is not set to zero unintentionally.
Not currently. MP4 videos can be exported in one run, but JPGs require splitting scenes into separate PSD files as a workaround.
