Discover how to optimize your Photofic Photoshop templates for effortless bulk design replacements and perfect product mockups.
Hi there, so in this video, we will see how to make photofic Photoshop templates compatible to work with bulk mockup. There are certain limitations of photofic template while working with bulk mockup. I have seen many complaints like the design file is quite big or the design file is not placed according to our wishes.
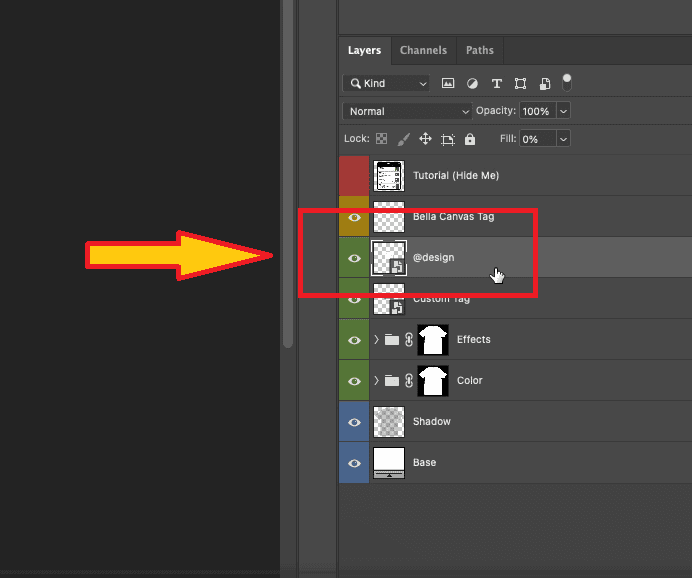
So I will explain the structure of the photofic template and we will see how this can be made compatible to work with bulk mockup. So first I will just hide the top layer and this is the photofic art template. So as you can see, let me zoom it for you, we have Bella canvas tag.
So if you want to remove this tag, we can remove that and then we have two smart object layer. First says your design and the second one says custom tag. So as you know, bulk mockup works on a smart object layer.
So we are supposed to replace the smart object which says your design. So first we will rename this as at the rate design. By renaming we make sure that we are forcing bulk mockup to work only on the smart object layer.
Do not worry about the smart object, I mean layers inside this group. If you want to change the color of the t-shirt, you can do that. So there are already all Bella canvas colors available here.
So you can change the color if you wish and this is the effects group, which is this design. This is also smart object layer, but this one and this one is linked. So we are only working on the smart object layer.
So what happens? Let me show you the problem when you work with bulk mockup and photofic template. What happens? So bulk mockup, when it works with a photoshop template, it opens up the smart object layer.It will double click and open the smart object layer.
Now over here, you see the design is placed at the center. And the canvas, there are a lot of negative spaces and because of this, the problem occurs. If I grab a design, let me check my download, I could have a design here.
If I grab a design and place it over here and remove the previous one. So bulk mockup, whenever it works on any design, it takes the reference of the canvas and it tries to place the image into full canvas. So when we click and save it, you’ll see the discrepancy.
It covers the entire t-shirt and you could clearly say why this is happening because the creator of this template, photofic, wants to place a design at the center. So if you place it at the center, you’ll see the design is perfectly placed. So how do we force bulk mockup to do this? If you are not following along the settings of bulk mockup, let me just open up.
I’m sorry about this. There must be some key that I could place in. Just give me a moment, I’ll pause this video and come back.
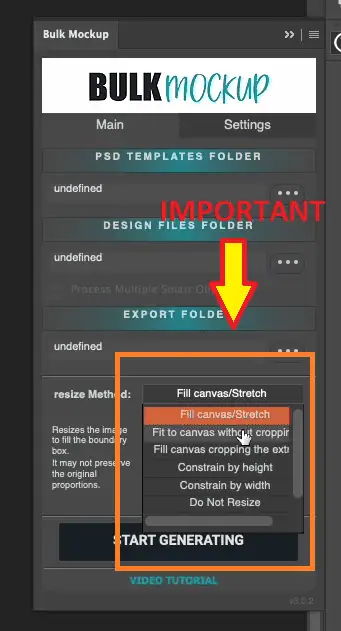
Okay, so I have bulk mockup here. So if you look at the design option that we have, resize option I mean to say. So first option is fill canvas stretch.
So whenever we, let me just open this smart object layer. So whenever we work, fill canvas and stretch. So the design file will be filled up and it will stretch like this.
So it will not leave any negative space and this is the reason what happens. The second one is fill canvas, fit to canvas without cropping. In that case, the design will be placed something like this.
It will fit to the canvas and on the left and the right, it will leave some negative spaces just like how we can see over here. Third one is fit cropping the extra. In this case, it will fit like this and it will crop on the top and the bottom.
All the resize option that we have, it is illustrated on to this thumbnail images over here. Constraint by height, constraint by width and do not resize.When we click do not resize, this is very ambiguous because it depends on the size of your design file that you’re using.
So in this case, for a photo fit template, the best way, the settings there is to use our resize to guide and aligns to guide. So resize to guide and align to guides is an advanced tool or you can say advanced feature. Let me explain you how this works.
So if we have this resize to guide and align to guides check, I double click on this smart object layer. What we can do? I’ll press control R to bring on the rulers. I’ll put four guides.
This is very important. It needs four guides, neither less nor more. So we have the four guides and the intersection region between these four guides over here this place.
So now bulk mockup will consider this intersecting space as the new canvas. So whatever resizing that we use, instead of following the entire canvas, it will take this intersection space as the reference and it will resize accordingly. So to reiterate, create, I mean, go to the smart object layer, go inside the smart object layer, bring out the rulers and create guides and that has an intersecting space.
Make sure that you use only four guides, neither six, neither three, four is required for bulk mockup to understand. Now on the settings, check this resize to guides and align to guides feature and on the main, you could select anything. Whatever you wish, you can select that and bulk mockup, whenever it works, it will consider the intersection space as the canvas and all the resizing method and the alignment method, like if you want to align on the top, will happen according to this intersecting space.
So this is how you fix a photovic template to work with bulk mockup. I hope it is clear.If you still have doubts or you cannot get it to work, you can contact our team or you can put a comment below and our team will respond as soon as possible.
So thank you for joining in for this video. Have a great day.
Many POD sellers face challenges when using Photific apparel templates with Bulk Mockup. Designs may appear too large, misaligned, or not centered as expected. This guide walks you through the exact steps to make your Photific templates fully compatible, so every mockup looks professional.
Photific templates are designed for centered designs and realistic apparel previews, but Bulk Mockup interprets the full canvas as the design area. This can lead to:
With the right setup, these issues can be completely avoided.
Bulk Mockup works on the main smart object layer (Your Design).

Ignore other smart objects like effects — Bulk Mockup focuses only on @Design.
Tip: For Photific templates, the Resize to Guides + Align to Guides option ensures perfect placement every time.
If you encounter issues while working with Photific apparel templates or Bulk Mockup, our support team is ready to assist. Leave a comment or contact us directly, and we’ll help you get your mockups production-ready.
Photific templates are pre-designed Photoshop mockups for POD products like T-shirts, hoodies, and mugs. They allow you to place your designs in realistic, professional-looking scenes, saving time and improving presentation.
Bulk Mockup uses the full canvas by default. Photific templates often have centered designs with extra negative space, which can stretch or misplace your artwork. Using Resize to Guides + Align to Guides fixes this issue.
Open the main smart object layer (@Design), enable rulers (Ctrl+R / Cmd+R), and place exactly four guides. The intersection defines the canvas area Bulk Mockup will reference for resizing and alignment.
Yes! Photific templates come with pre-defined apparel colors. You can change the color inside the smart object layer without affecting Bulk Mockup’s ability to replace designs.
Absolutely. Once your Photific template is configured with guides and Bulk Mockup settings, you can replace any number of designs quickly. This is a one-time setup that works for bulk mockups indefinitely.
