This guide shows you exactly how to set up your files and folders to automate this process successfully.
If we give it transverse sending the files and let me show you from start.
So these are the patterns files that you have.
I am recording part of my screen so maybe at some point the things go on the right will
not be able to see.
So anyways I will try to be, yeah these stick template that we have that we have done manually.
I will open them in Photoshop.
So I believe the end of the pattern that we have filled in the manually is the correct
size and I will try to replicate this.
So what I will do is, I will close this, I will let it be as it is.
First thing I will close the file.
First thing first, I will resize all these patterns into one file.
So what I will do is, I will go to email file script, email processor.
Over here I will select the folder.
These are the pattern files and I will clean up them.
Now I will keep on saving the same location and over here I will select the resize to fit.
So I want all of them to be a resize to maybe 3000 pixels to 3000 pixels.
This is the size that I want them to be a resize.
And I do not have any actions saving save folder, keep folder structure.
So I think it will create a new folder file around this.
So basically all of them has 3000 or 300 ppi but they are being re -sized to the same size.
Now re -sizing them to the same size will help us create the template that we want.
So this is the pattern and now all these has been re -sized.
If I bring all of them over here, you will see this wait a minute.
It should have re -sized it.
Yes or here we have this.
So these are all the original ones and this one is the sub -fulder where all the re -sizing
has happened.
So if you look at the size it is 3000, all of them are consistently re -sized to the same
pattern.
Now I will create a new file with the same size.
Okay.
Why is this happening?
I want a custom you know pixels 300 3000.
Okay so I want 3000 by 3000, 300 ppi.
As similar to what we have the design as.
Now I will name this placeholder design.
I am going this because all the mirrors are pnjpg and that will create some issues like
I mentioned in the call.
So I will add some color.
Maybe I will duplicate this.
I will save it as a PSD file.
Let us try that.
I could save it as a exported to pnj but let us try PSD.
So that will definitely be a control.
Okay so I will add in that call and they will be.
Yeah.
Let me save this as.
So I will save this.
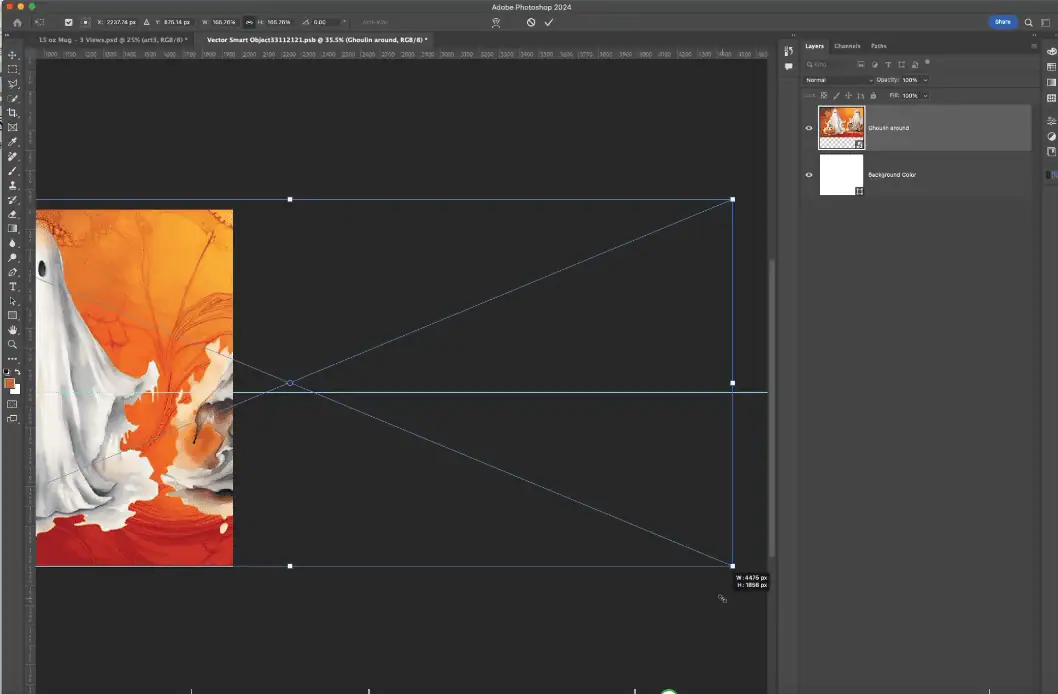
Now it is time to create the or I have an editing template.
So I will open the template and be manual edited one.
Now let me open this and over here if we look at this.
This is a pattern field.
So what I will do is I will graph this design the pattern that we have.
Which one is this?
Okay.
So I think we missed this pattern.
It is not over here.
If we could find the same pattern here, we could use the same sizing and help us.
So I am not pretty sure but anyways I will show you what I mean in the other one.
So that you could follow that.
So we do not have this pattern.
Do we have the other one?
Do we have this pattern?
The flower one?
No we do not have that as well.
So it is pretty hard to get.
So I will have to use, I mean I wanted to exactly match the size but it looks like we do
not have these three patterns over here.
If we had these three patterns, it would have been easier for me to do that.
But anyways let us try.
Yeah.
So first is let us try to say design three.
This is the design.
Now I will place the placeholder design over here.
I am not sure how good this placeholder design needs to be.
I mean how big if you want this to be this or if you want this to be this.
I am not pretty sure.
It should have been determined by the previous one.
I will grab one of the pattern from the JPG.
Remember these size and this size is similar.
So I will place it over here.
I think you would not want this size and this size is quite small.
So I think probably you want this to be this big I mean.
Let me get this big.
If I save this, let us check.
If this is the correct size, it is well and good if not, we could decrease the size maybe this much.
And then duplicate this and place it like this.
And then I will delete these smart object layers and rename this as add nested.
Now I will save this and close.
I will do the same thing with this one over here.
It is the same design.
So what I will do is I will just duplicate this one.
So I will take an open this and I will copy this and duplicate the layers on dual layer 121 PSP.
So I think this is good.
I mean this is present the same size I believe.
So remember that and save this.
So now this has been placed.
Now let us try the other one.
I think this also has a similar structure.
I mean similar stuff has same flowers but different size.
So I will duplicate this.
This is nice same size.
Now if I duplicate this one, this will be upside complex because this is more allow operator over here.
Allow it in the center is wider.
So I have to duplicate this again.
So I am not pretty sure if this is the correct way to proceed.
I mean we wanted to increase the size you could do that.
But let me leave it here to see if the size matches.
So is this matching or we need a bigger design?
I think we could increase the design size.
I mean this is what it needs to be.
But you could play with the design.
I mean play with the size of the design.
It is up to you.
Maybe it is just small notch.
Sorry, let me notice this a bit.
Much better I believe.
This is how I am playing with the size.
Had you given me the exact pattern, it would have been easier for me to mix them.
Now let us go to this one.
Again it matches these two in the terms of size.
Yeah similar same size.
And I think this matches the other one.
So I think now the sizing sizes are being consistent.
And yes we could follow the same structure.
If you use this template and now these patterns are all of the same size.
So these are all of the same size.
There will be no discoprency in the difference in the sizes.
So I will send you this template and then I will ask you to or maybe shall I process them for you.
Let us try that maybe a patch of three.
So I will create folder.
We will have design T and I am not sure which are the two.
These are length I guess.
These are the two different ones.
So I will remove this three.
I will have some tell remove.
So we need a folder name.
Design three side and then we need one name design three.
Okay then we need remove this epa -stuffey.
We need design two and we need one design two side and then design one.
Okay so we have these folders and let me paste three designs.
Three different design.
We will put this on design one.
Same thing we will want design two.
I will take that three other designs for design two and design two side same design we go there.
And these three for design two.
Yeah so I think these are the design folder.
I will put a new folder here and name this test.
And drag and place all these three size three meters into the test.
And close the file and let us run a small demo.
This is the template that we have.
And then we have design file which is again in the pattern and then test.
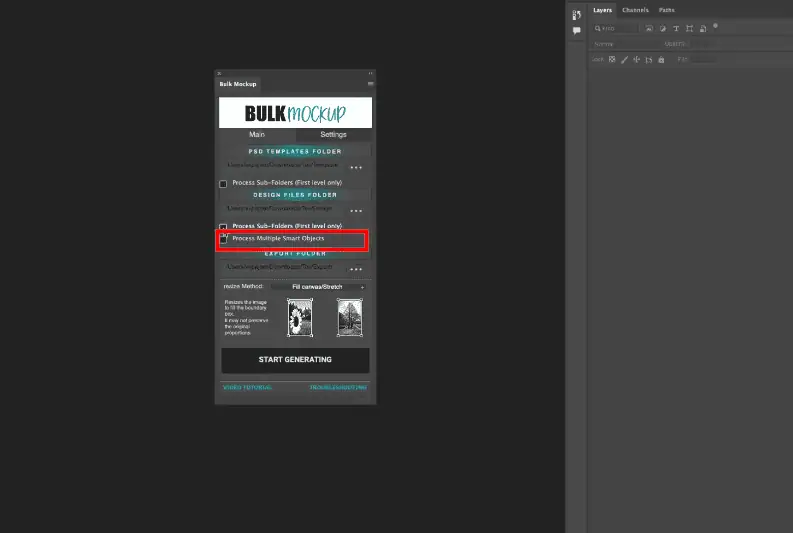
We want to press a sub folder for the click process multiple smart objects.
And then we have an export folder as well.
Export on this settings.
We go download this file.
Export folder is fine.
We do not want to be put in what you believe.
Name is fine.
folder is all the support folder.
It is fine.
Or we will unknight the right foot.
You can see design file.
ES does try this now.
I will still look in the back of the second export folder and hopefully we will have the same sizes.
Export is coming around anytime soon.
We have the first one.
Yeah this is okay.
Let us complete it all this file.
I can decide that pretty down accurate.
Or if you know you will otherwise.
But yeah this is how this needs to be done.
I will send you the template and I will save file as well.
So we will have three outputs I guess.
We already have two of them.
I thought it was on its way.
Yeah.
So let me check.
I think the size of particular I guess.
Or if you know what you think.
And I will send you this template as well as this video.
I will have this folder.
When your wraparound mug design needs to appear in three specific positions (left, center, and right) on a mug mockup, and your design files are larger than the smart object layers in your template, you’ll need to use Bulk Mockup’s multiple smart object feature with nested smart objects. This guide shows you exactly how to set up your files and folders to automate this process successfully.
Before you start, examine how your mug template is organized:
If you’re purchasing new templates in the future, look for ones from marketplaces like Styled Product Mockups that use a single smart object for all mug positions. These are much easier to automate since one design file automatically fills all three regions.
Set up a folder hierarchy that matches Bulk Mockup’s multiple smart object naming convention:
For example, if you have a Halloween design with a pumpkin on the left, text in the center, and a ghost on the right, split your design so the ghost goes in R1, text in R2, and pumpkin in R3.
This is critical for nested smart objects to work correctly:
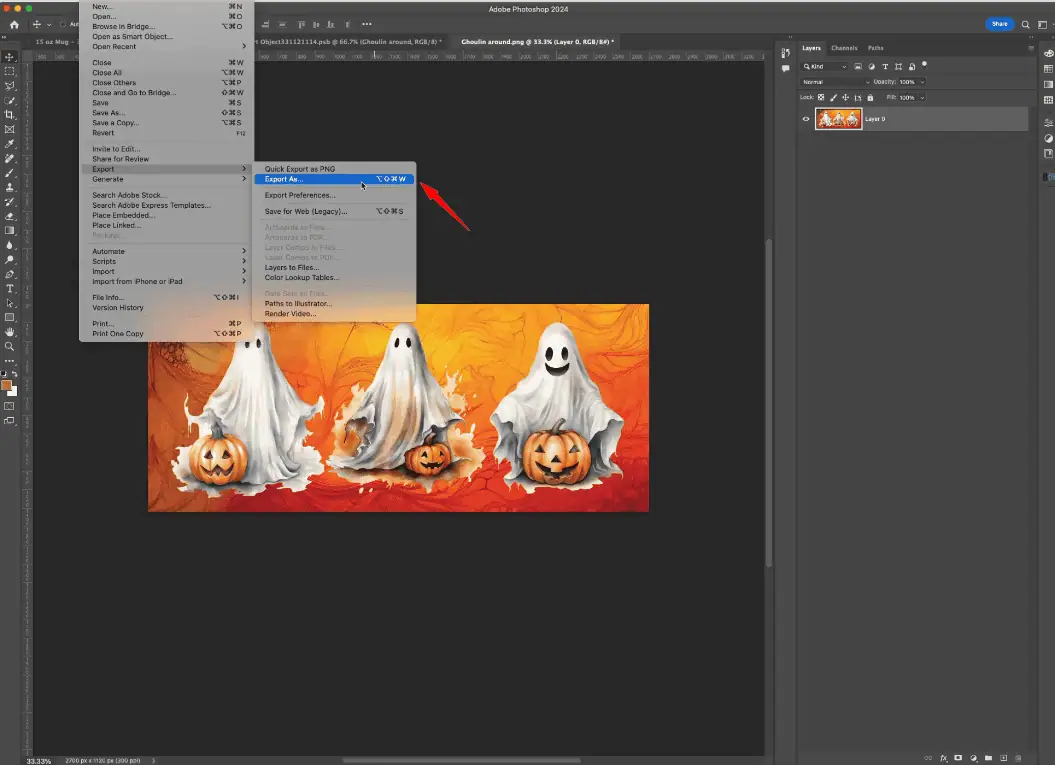
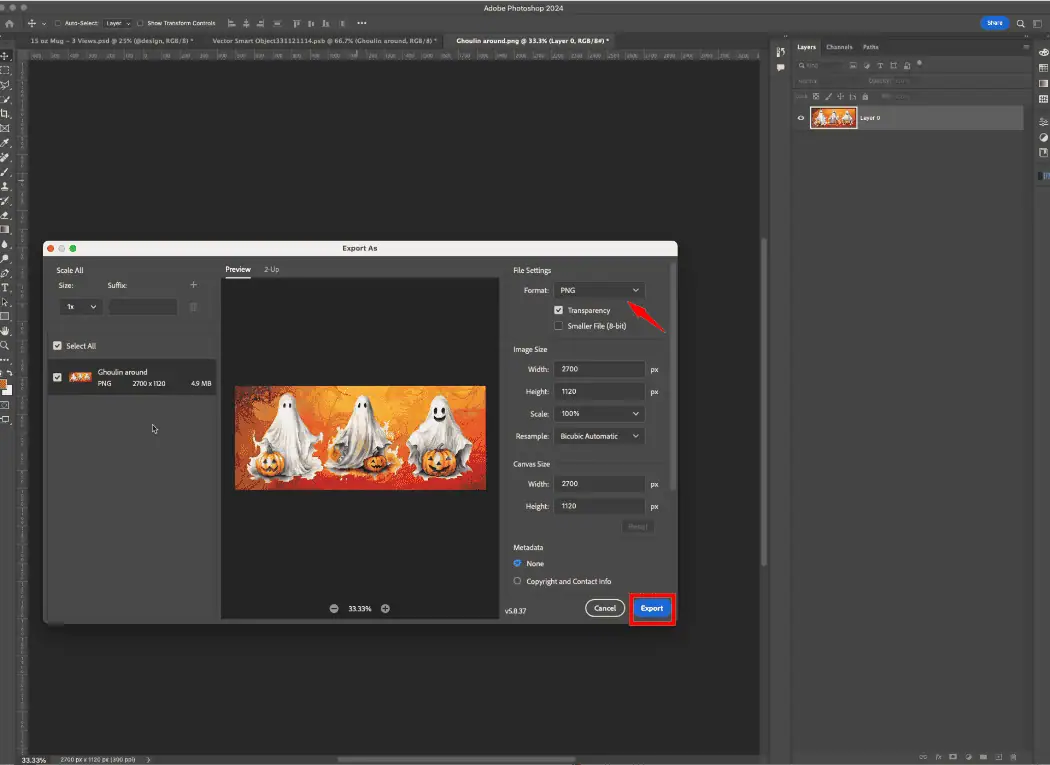
Never use “Save As” PNG—always use “Export As.” A flattened PNG won’t work with nested smart objects even if it’s the correct file type.
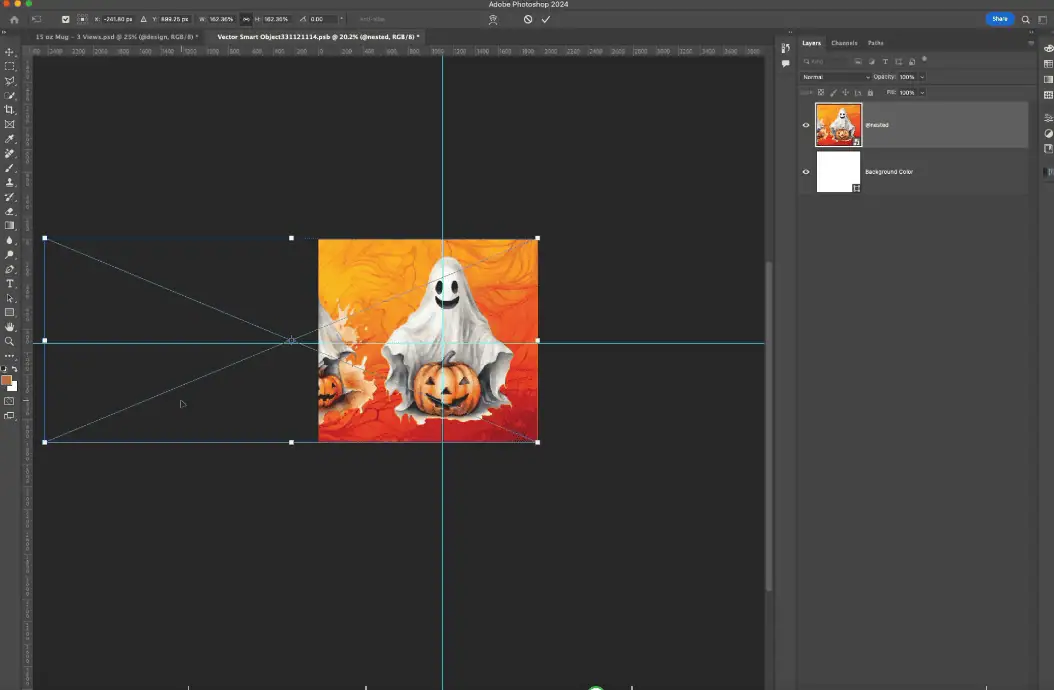
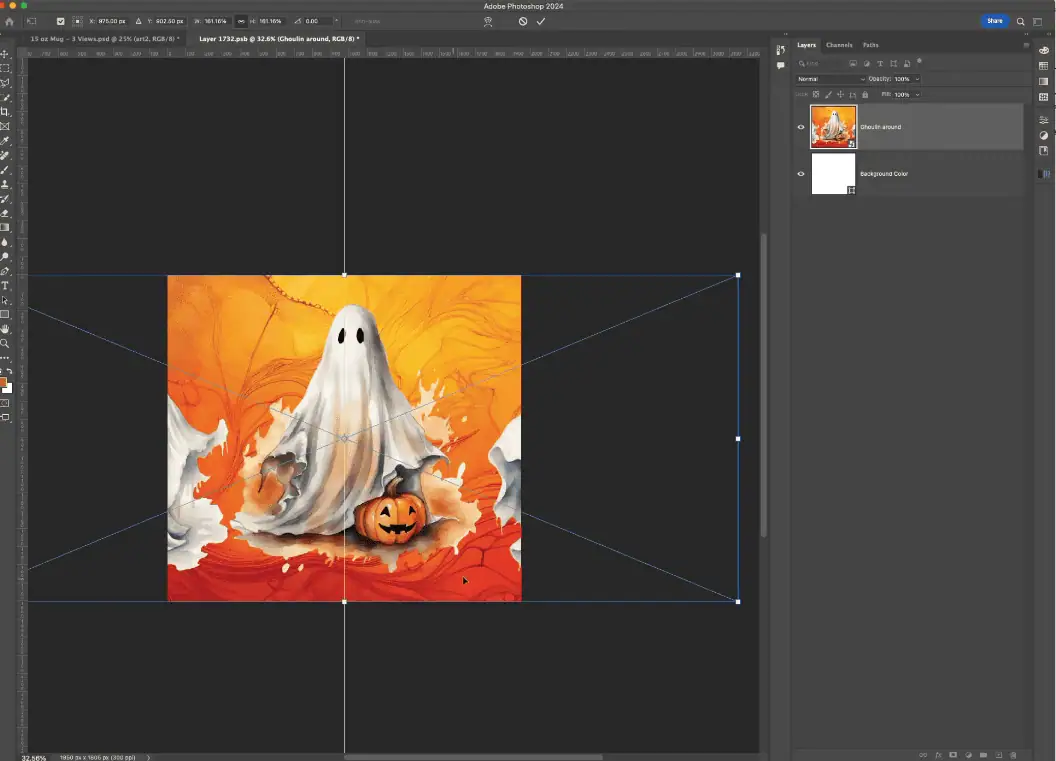
Since your design files are larger than the template’s smart object layers, you need nested smart objects:

The “@nested” naming is crucial at this stage. Bulk Mockup recognizes this naming convention and will look inside this smart object to swap your designs during batch processing.
Repeat the nesting process for each mug position:
For the right mug:
For the center mug:
For the left mug:
Save your template after setting up all three nested smart objects.
Configure Bulk Mockup to handle your folder structure:
Finalize your settings before generating mockups:
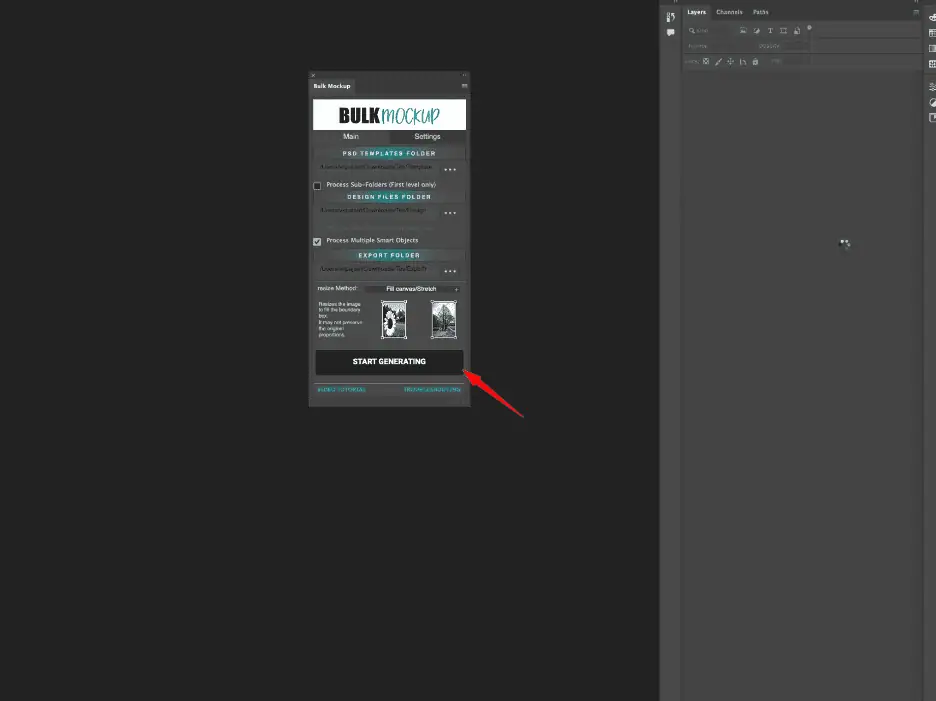
Bulk Mockup will now process each design variation, swapping the contents in all three nested smart object layers automatically. Your completed mockups will appear in your export folder with each design portion correctly placed on its corresponding mug position.
Your template uses separate smart object layers for each position instead of a unified smart object. You must organize designs into subfolders matching each layer name and enable “Process multiple smart objects” in Bulk Mockup’s settings for the automation to work correctly.
Non-flattened PNGs exported using “Export As” retain layer information and transparency data that nested smart objects require. Flattened PNGs saved with “Save As” lose this data, causing nested smart objects to fail even though they’re technically PNG files.
Not with templates that have separate smart object layers for each position. You’ll need to either split your design into three separate files for R1, R2, and R3 folders, or purchase a different template that uses a single smart object covering all positions.
Check if your design file dimensions are significantly larger than the smart object layer dimensions in your template. If your design is 3000×1500px but the smart object is only 1000×800px, you’ll need nested smart objects to maintain quality and proper placement.
Verify that your subfolder names exactly match the smart object layer names in your PSD template (case-sensitive), ensure “Process multiple smart objects” is checked in Bulk Mockup’s Main tab, and confirm each subfolder contains at least one design file before processing.
