These Smart Object mistakes cause blurry prints, broken actions, and failed image checks on channels. Here’s how to fix


A good POD mockup tells buyers exactly what they’ll receive, but poor preparation can get your listing rejected. Many sellers put blind faith in smart objects and then wonder why their batch process fails. They commit common smart object mistakes that make POD mockup batches useless.
We have picked six such smart object mistakes, explained why they happen with examples and how to fix them.
Many beginner POD sellers think that simply replacing the smart object with artwork will create a mockup. Without a proper resolution fit, the mockup won’t display the design as intended.
For instance, you have a 1500×1500 pixel design for a mug. You drag it into your template and convert it to a smart object, then scale it up to fill a 3000×3000 area.
On your screen, everything looks fine, so you use the image in your store. Customers zoom in and leave reviews complaining that the edges look soft. You send replacement mugs and wonder why the smart object lost quality.
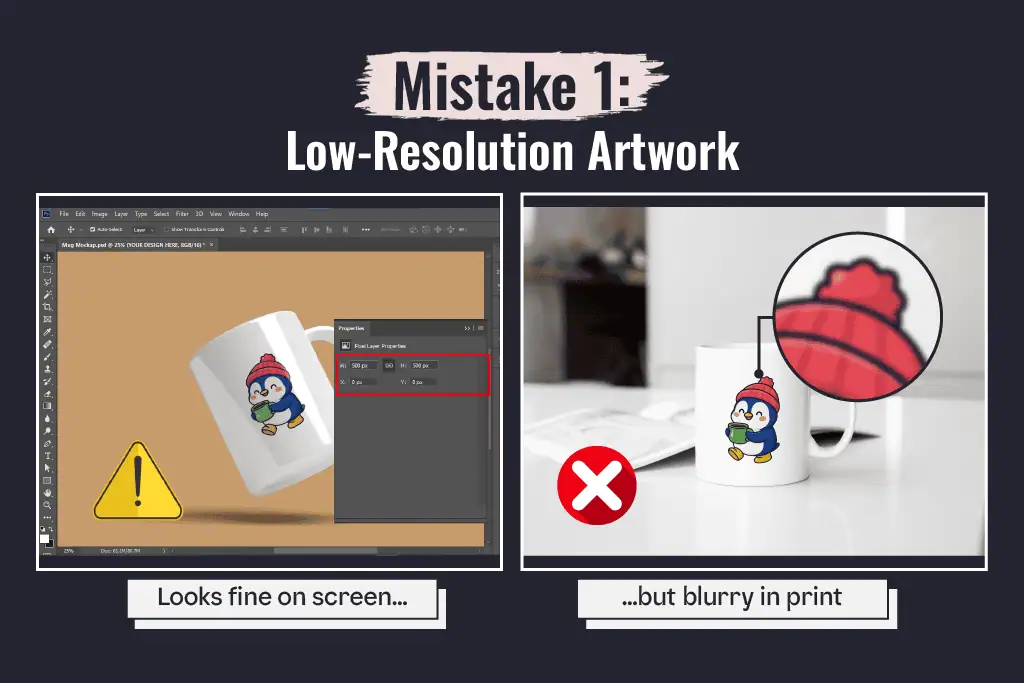
A smart object preserves the original image data so that transformations do not destroy the pixels. It does not create new detail when you scale up a low‑resolution source.
Adobe explains that a smart object enables non‑destructive scaling, rotating and warping, but they can’t invent pixels. You can resize without losing any quality.
Many POD sellers misinterpret that smart objects automatically handle the resolution requirements of mockups. They don’t.
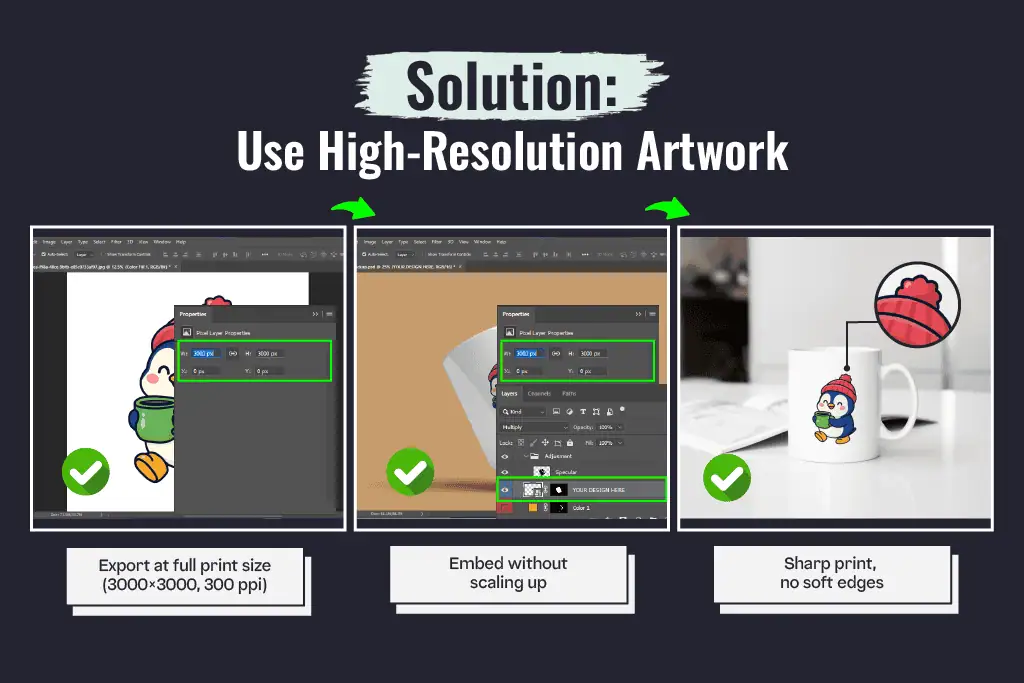
If you only have a small image and must enlarge it, increase its dimensions inside the smart object using Image > Image Size with a suitable resampling algorithm.
Once done, check the quality with a small test print. This extra step avoids the soft edges of the POD prints, and the orders are not returned.
Adobe Photoshop allows you to record an action and repeat it on other smart object templates. However, it may work for the same POD products and similar templates, but not all.
For example, you can record a Photoshop action to automate mockups. The action opens a shirt template at 3000×2000 pixels, duplicates the smart object layer, scales it to 90% of the canvas and exports a JPEG.
It works great on the first file. When you run the same action on a hoodie template that measures 4000×3000 pixels, the design is misplaced and partly off the garment.
You end up manually adjusting each file and spending more time on each mockup. It, thus. defeats the purpose of mockup generation automation with recorded Photoshop actions.

Photoshop Actions record commands relative to the document state. You can save it and run it again on other files.
Julieanne Kost, an Adobe evangelist, notes that if you record an action with units set to percentage instead of inches or pixels, the placement of shapes or text will remain proportional across images.
If you record transformations with pixel units, those steps apply absolute values. When you play the action on a document with different dimensions, the pixel‑based transform scales incorrectly.
Even with percentage units, resolution‑dependent commands like font size or blur amount produce different results on different document sizes.
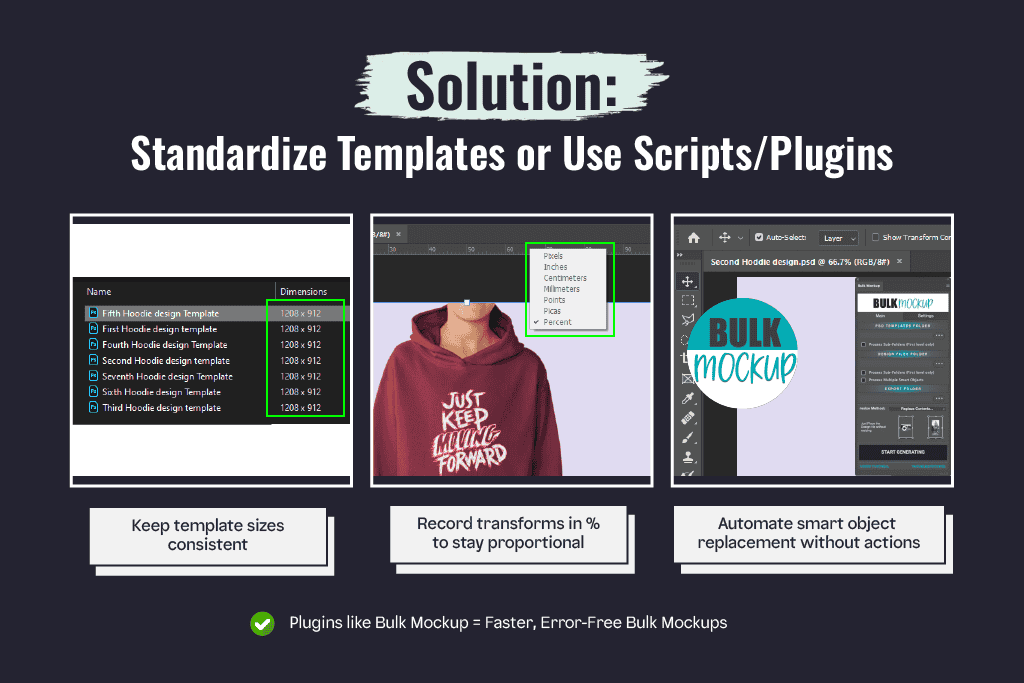
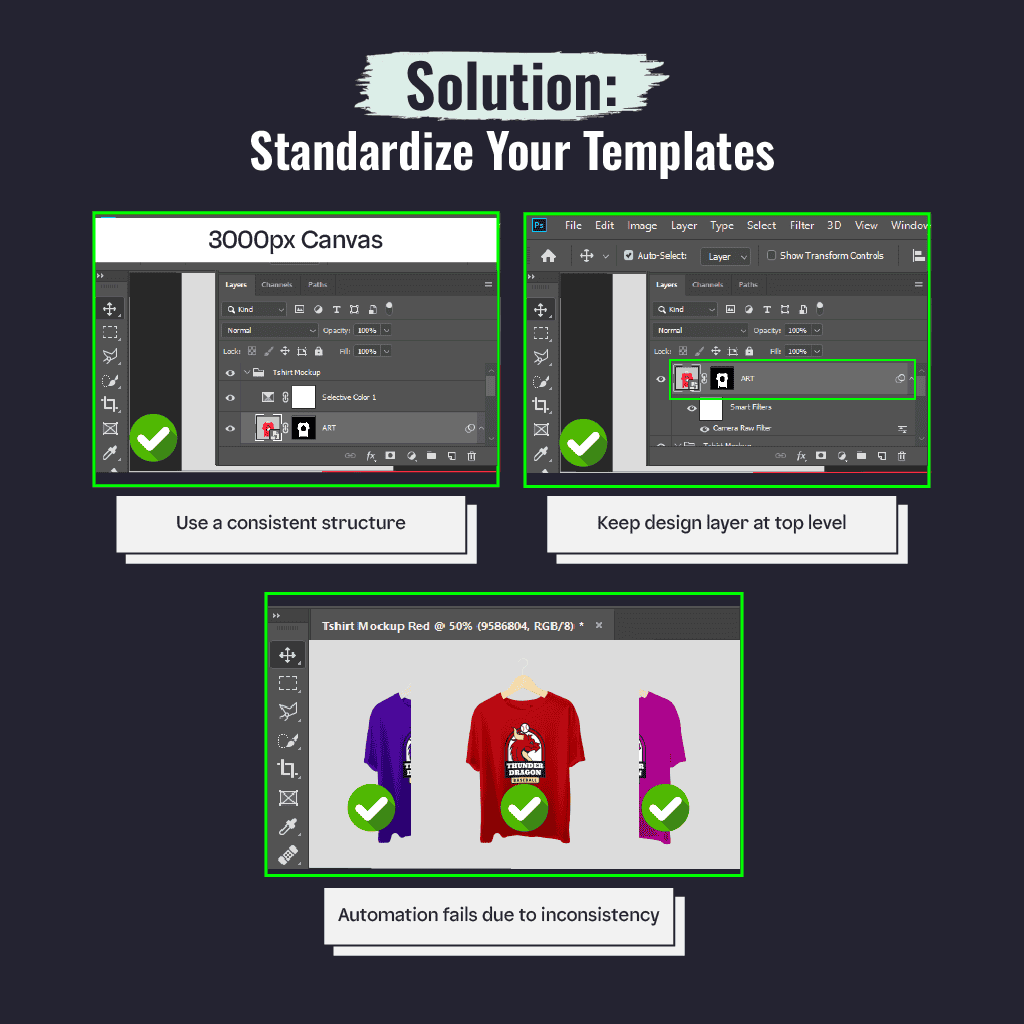
Standardise your PSD templates and artwork sizes whenever possible.
If you need to run actions across mixed sizes, set your rulers to ‘percent’ before recording any transform to keep positions and scale proportional.
Avoid recording complex transforms in actions at all. Many POD sellers use scripts that replace the contents of a named smart object layer without recording the transform.
Photoshop plugins such as Bulk Mockup let you update designs across multiple templates in one step without having to record transforms.
Newbie POD sellers use the same mockup files for multiple POD sites. This mistake drives customers away. Let’s say you prepare a square 2000×2000 JPEG, assuming it will work for Etsy, Amazon, Shopify and Redbubble.
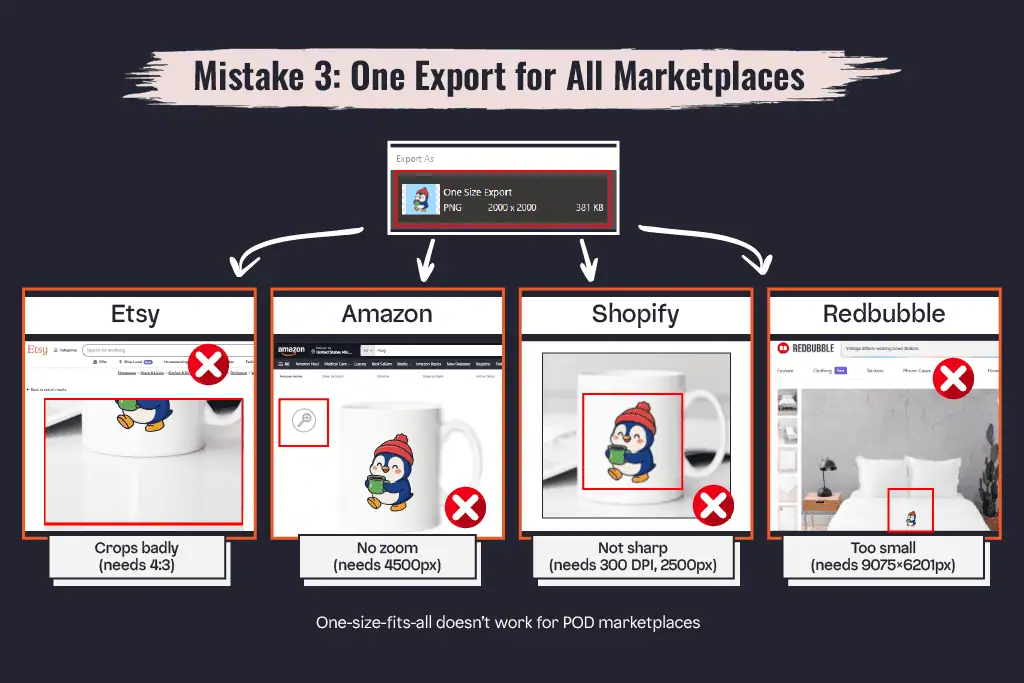
Each marketplace has its own technical requirements.
Based on this list, you inevitably fail at least one platform’s standards when you use a single export.
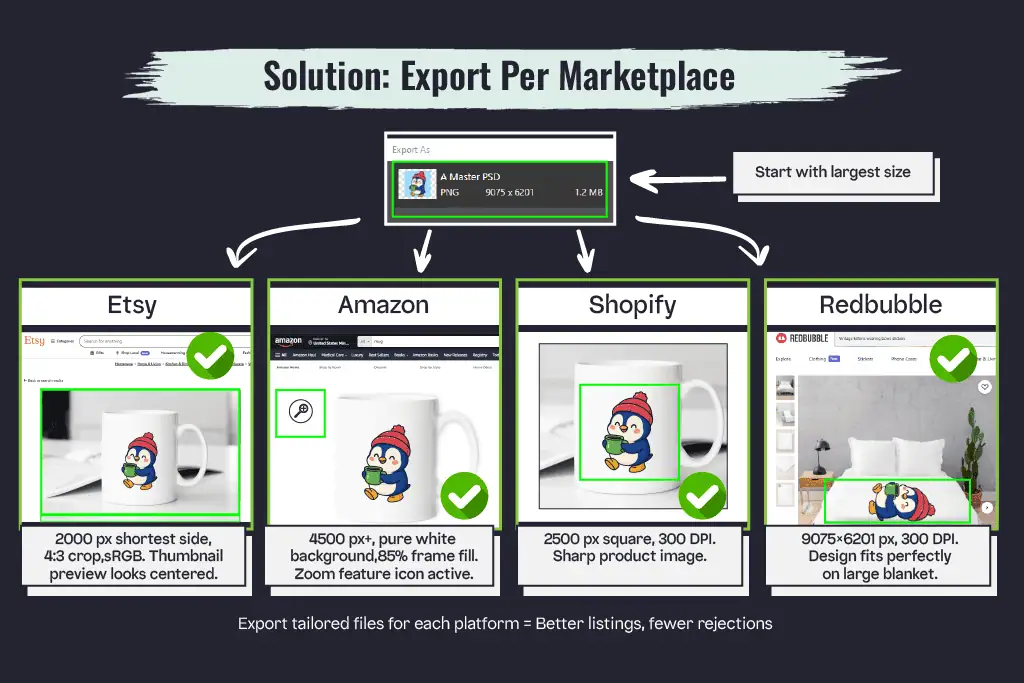
Export separate files for each marketplace. Start with a master PSD template built at the largest required size (for example, 9075×6201 for Redbubble) and scale down for other platforms.
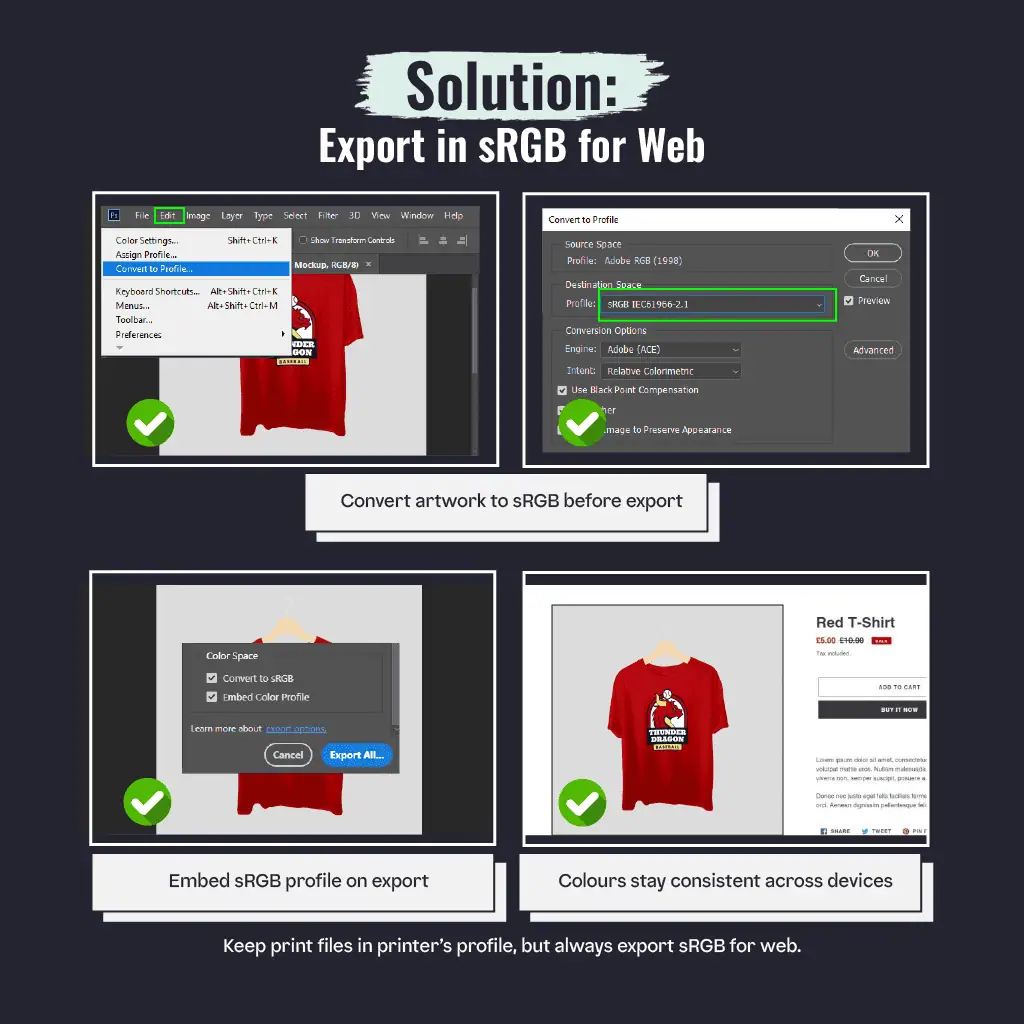
Use sRGB colour for all listing images.
This may feel like extra work, but it prevents rejections and improves how your products are displayed.
One of the common POD product listing mistakes is not considering or understanding the color profile of mockup images. Different devices may display your product images differently.
For example, you finish a bright red t‑shirt design and export it using Adobe RGB because that is your monitor’s colour space. You upload the JPEG to Shopify.
On your listing page, the red looks dull, and on some devices, the background appears slightly green. You think it’s a printer issue, but the problem is the colour profile.
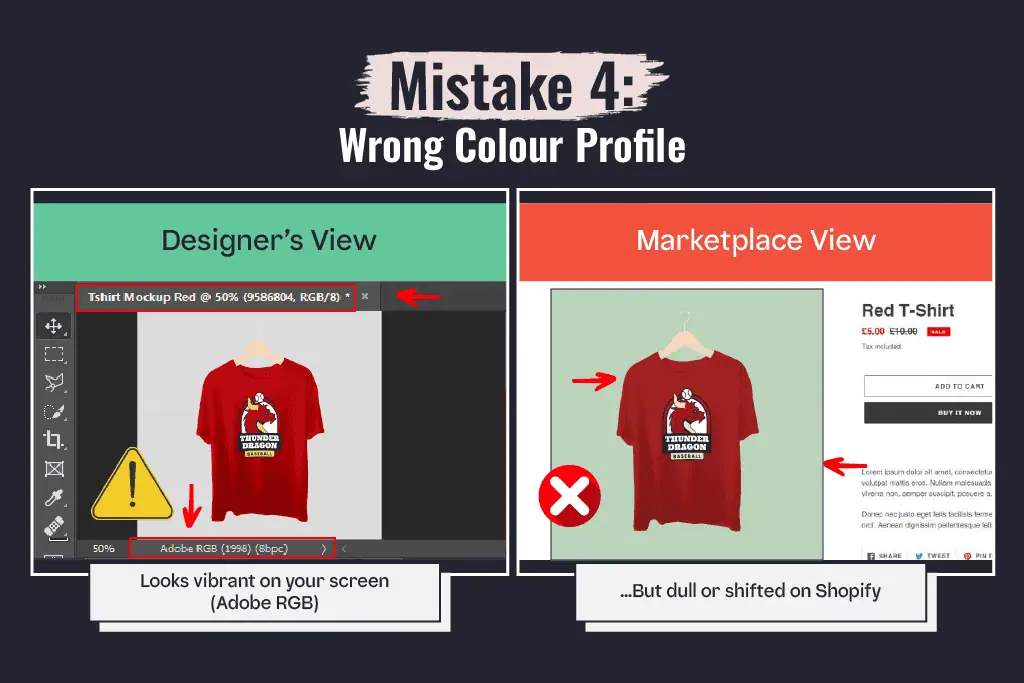
Web browsers and most e‑commerce platforms assume images are in sRGB. Adobe’s non‑destructive editing documentation explains that Smart Objects preserve colour data, but you still need to export in a web‑safe profile.
When you export in Adobe RGB or Display‑P3, colours appear oversaturated on monitors that can’t interpret those profiles and shift unpredictably.
Convert your listing images to sRGB before exporting.
Keep your print-ready artwork in the profile required by your print provider, but always use sRGB for product photos.
Running a quick test upload to your store will confirm that colors look consistent across devices.
Using PSD templates that are not uniform is a big mistake for automated batch mockup generation. Also, generating mockups manually with templates of different configurations leads to a mess.
Let’s say you have downloaded free PSD mockups from various sources. One file names the Smart Object layer “Logo”, another uses “Your Design Here”, and a third nests the Smart Object inside a layer group three levels deep.
Also, some templates are 1500 pixels wide while others are 3000 pixels. You build an automation script to replace the Smart Object contents, but the script fails on half of the templates or places the design in the wrong layer.
The automation won’t be able to recognize the nested smart object layers. It will lead to an error during a batch mockup generation. You end up manually finding and replacing layers.
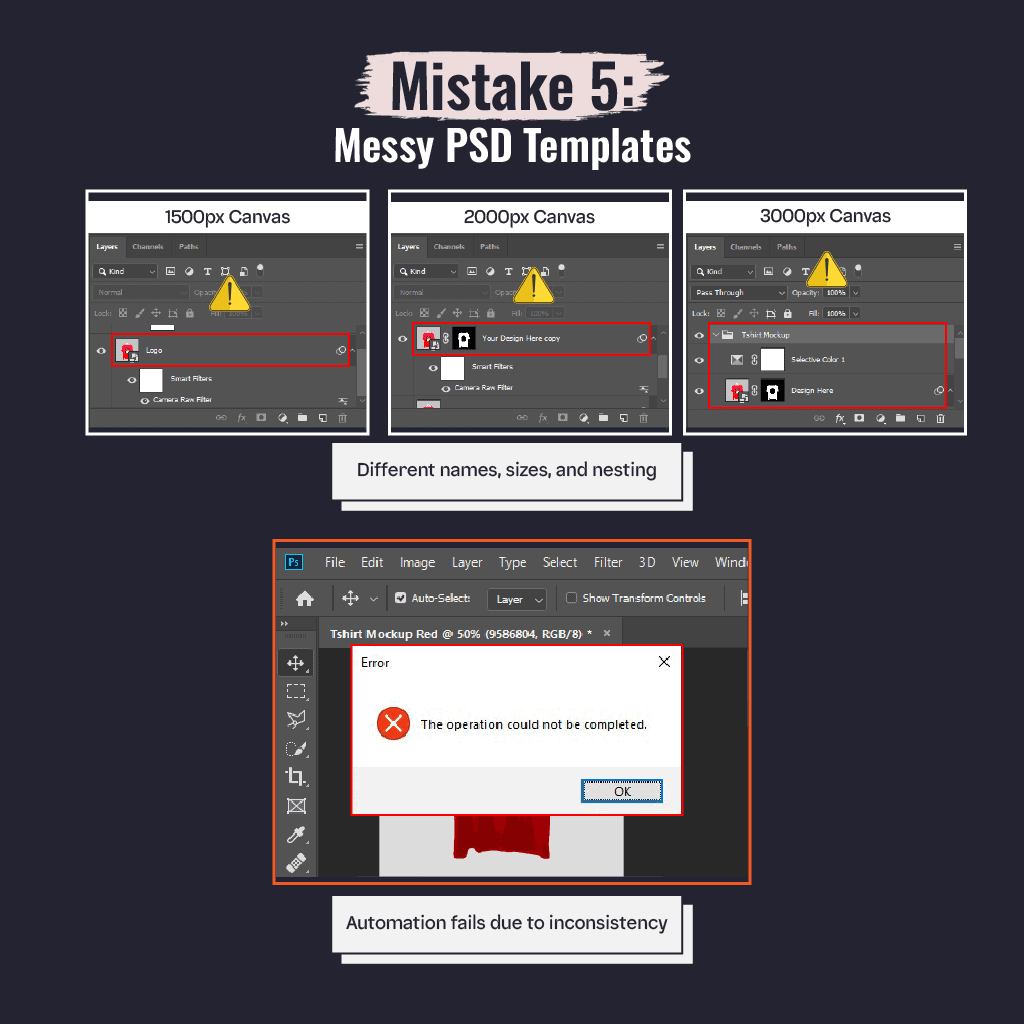
Smart Object automation works best when templates follow a predictable structure. Scripts and plugins look for a layer name to replace. When names and locations differ, the script can’t find the right layer.
Nested Smart Objects also complicate batch processing because your script might need to open multiple levels to replace content.
Mockup errors, like improper rasterization, appear due to complex or uneven nested smart objects.
Bulk Mockup can then find and replace the smart object by name across many PSDs. When you download free templates, inspect them first and rename the layers to fit your spec.
Considering that a smart object will always update a new design to multiple mockup templates is a wrong conception.
For instance, you duplicate a smart object in a mockup three times to show a mug from different angles. Later, you open the Smart Object, replace the design and save it. Two of the instances are updated, but one stays unchanged. You waste time trying to find why.
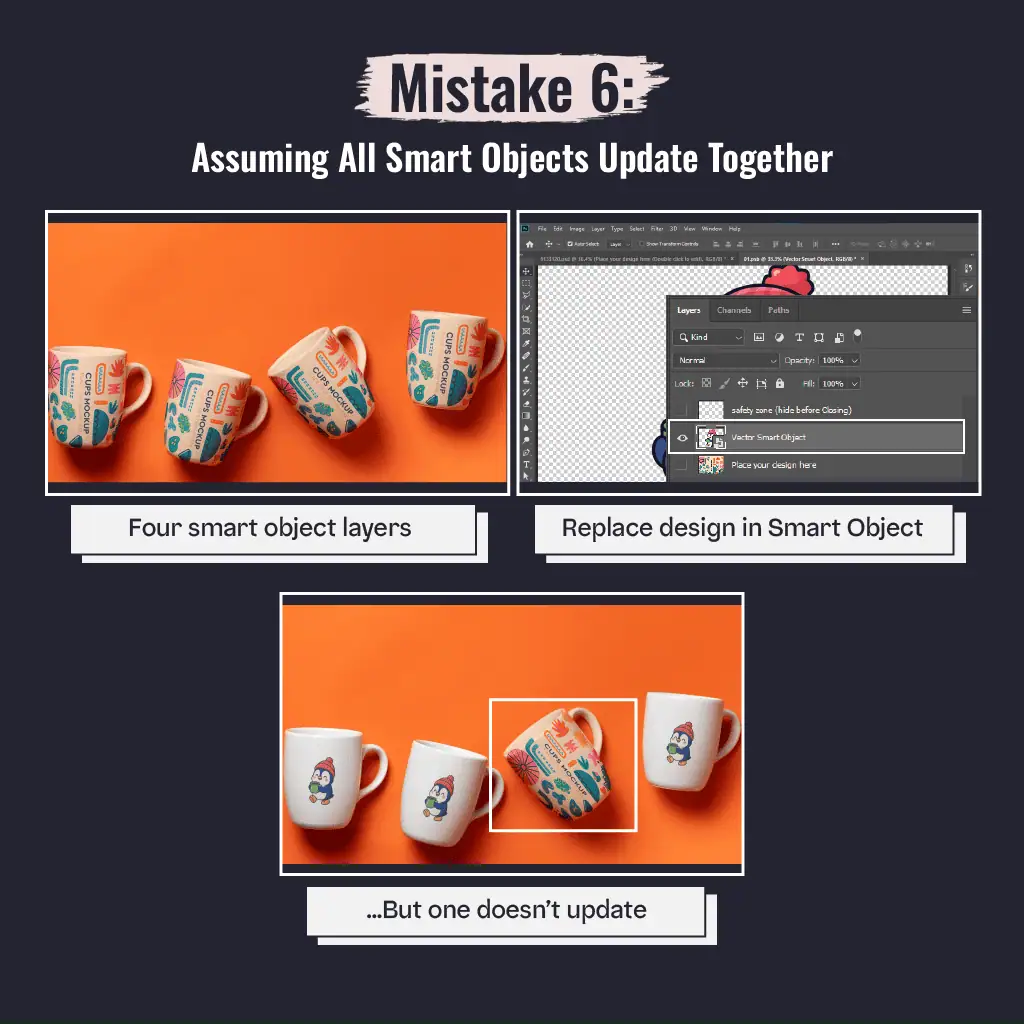
By default, Photoshop duplicates Smart Objects as instances of the same file. If you choose New Smart Object via Copy, Photoshop creates a separate file. Only instances of the same Smart Object update simultaneously; new copies will not.
A user on Graphic Design Stack Exchange explains that if you put vector layers into a smart object, the smart object renders to a raster in the main document, and scaling that object doesn’t preserve vector crispness.
Use Duplicate Layer (or Layer > Smart Objects > New Smart Object via Copy) intentionally. When you want linked instances that update together, duplicate the Smart Object normally.

When you need independent copies, choose New Smart Object via Copy. If your design contains vector artwork and you need to scale it beyond the original size, consider placing an Adobe Illustrator file as a smart object so it remains fully vector.
Keep in mind that once a smart object is rasterized at a particular resolution, scaling it up will still blur the edges.
A smart object is a special Photoshop layer that preserves the original image or vector data. When you edit the smart object’s contents, all linked instances update. This non‑destructive behaviour lets you resize, rotate and apply filters without permanently altering the source.
Some tools, like the Brush or Eraser, require direct access to pixels. When you try to apply them to a smart object, Photoshop prompts you to rasterize the layer, meaning it will convert the smart object into a regular pixel layer. This removes the link to the source file and prevents future non‑destructive edits.
A DPI mismatch occurs when the design you drag into a smart object has a different resolution (pixels per inch) than the template. To fix this, match the resolution of your design file to the template before placing it.
You can also open the smart object and adjust its image size with resampling to match the target DPI. Always check the exported image resolution in Photoshop’s Image Size dialog.
Yes. Double‑click the smart object thumbnail to open its contents in a new window. Make your changes (add layers, change colours, adjust size), then save and close. The parent document will update while keeping the smart object editable.
Bulk Mockup’s batch replacement script opens each PSD, locates the smart object named ‘@design’, replaces its contents with the next design file, exports the result and repeats.
You can manually create a smart object layer over the design area in your PNG and then define a displacement map. Check Bulk Mockup’s tutorial on converting Canva PNGs to smart object mockups shows a step‑by‑step method that avoids common mistakes.