

If you see a “smart object must be rasterized” message in Photoshop, it means you’re trying to apply an effect or transformation that isn’t compatible with smart objects. This guide explains why it happens, how to fix it the right way, and how tools like BulkMockup keep your workflow smooth, without forcing you to flatten your design.
Smart objects are special Photoshop layers that preserve image quality and allow non-destructive editing. Instead of editing pixel-by-pixel, you edit the source content (like a vector or image file), and the smart object reflects those changes.
This is useful for scaling images without quality loss, reusing templates across multiple designs, and editing linked files without opening each mockup. If you’re doing batch work with PSD mockups, smart objects are the key to keeping your designs editable and flexible.
ALSO READ: How to Create Smart Object Mockup templates?
This error typically means you’re trying to use a feature, like the Brush Tool, Filters, or Eraser, that needs to directly change pixels. Since smart objects protect pixels, Photoshop blocks the action. In other words, Photoshop is saying: ‘You can’t change this unless you flatten it into pixels first.’ That’s where rasterizing comes in.
Rasterizing means converting the smart object into a regular layer of pixels. Once you do that, you lose the ability to scale it without pixelation, any links to external files break, and you can’t double-click to edit the original content. If you’re working with 50+ mockups, doing this repeatedly can become a nightmare. It kills flexibility.
ALSO READ: How To Make a Smart Object Editable In The Easiest Way
Yes and you should when possible. To apply filters, use Smart Filters instead. To scale, use Free Transform (Ctrl+T / Cmd+T) directly. To edit the object, double-click the layer icon and modify the source. By keeping your workflow non-destructive, you save time, especially when using BulkMockup to push updates across dozens of PSDs.
Rasterizing makes sense only if you’re finalizing a design and don’t need to edit it later, must use pixel-based tools like the Brush or Smudge tool, or the smart object is interfering with your export logic. Otherwise, avoid it.
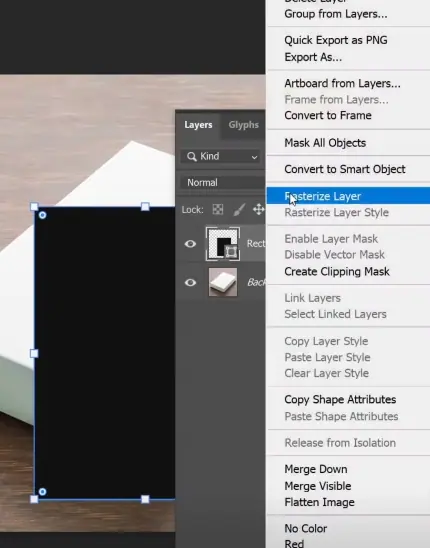
Right-click the smart object layer and choose Rasterize Layer.
Save a backup if you think you’ll need to re-edit it.
Pro Tip: If you’re managing hundreds of mockups, keep an un-rasterized copy to speed up rebranding, design swaps, or client revisions.
ALSO READ: How to Batch Replace Smart Object In Photoshop
BulkMockup is built for batch processing smart object-based mockups. Here’s how it helps:
If you’re getting constant rasterizing errors while processing mockups, your templates might be too complex or incorrectly set up. BulkMockup solves that by enforcing structure and clean smart object naming conventions.
ALSO READ: How To Create a Mockup in Photoshop
Rasterizing in Photopea converts smart objects or vectors into pixels, allowing direct editing with tools like brush or eraser.
Right-click the smart object and choose “Rasterize”. It becomes a regular layer you can edit with pixel-based tools.
It means converting a text layer into pixels so it can be edited like an image, but you can no longer change the text.
Photoshop shows this when you try to use a pixel-based tool on a smart object. You must rasterize it to proceed.
It means converting a layer into pixels so you can edit it with tools that require direct pixel access.
It means a layer has been flattened into pixels and is no longer a vector or smart object.
You can’t reverse rasterizing directly. Use undo or keep an original smart/vector layer backup.
Right-click the layer and select “Rasterize Layer”.
Smart objects preserve original image data and allow non-destructive edits. They’re ideal for scaling and batch mockups.
Hold Ctrl (or Cmd on Mac) and click each layer in the Layers panel.
Use the “Remove Background” button in the Properties panel or manually select and delete it.
Press Ctrl+T (Cmd+T on Mac) to use Free Transform and drag corners to resize.
Select the Crop Tool, define the area, and press Enter to crop.
Select the layers, right-click, and choose “Merge Layers” or press Ctrl+E (Cmd+E).
Rasterizing allows you to use pixel-based tools like brushes and filters. But it also makes the layer static and harder to edit later.
Stick to smart-compatible tools or work inside the smart object itself. Use smart filters instead of rasterizing.
It usually means the template has improper structure or includes unsupported elements like vector masks inside smart objects.
Yes. Tools like BulkMockup batch update smart objects across templates without flattening your design.